We are not affiliated, associated, authorized, endorsed by, or in any way officially connected with Fandango Interiors, or any of its subsidiaries or its affiliates. The official Fandango Interiors website can be found at https://www.fandangointeriors.co.uk.
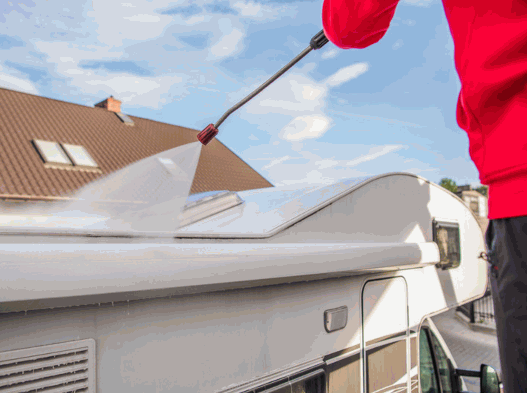
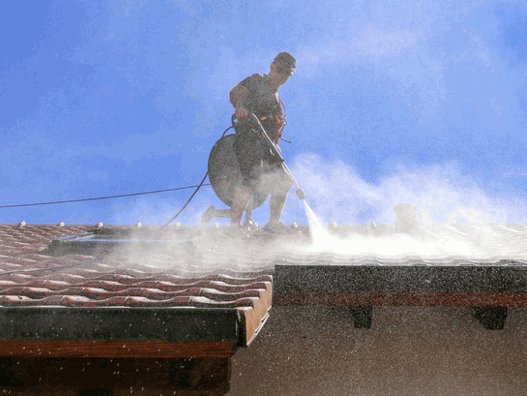
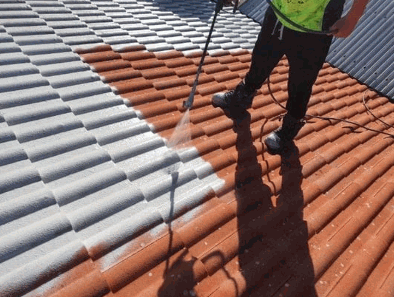
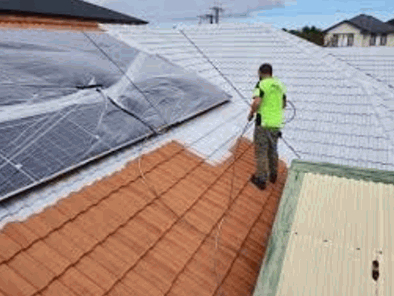
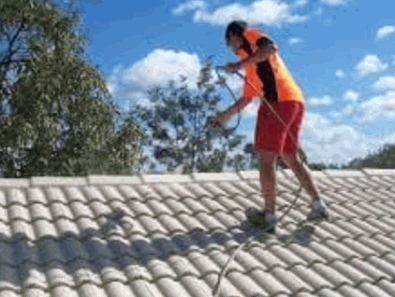
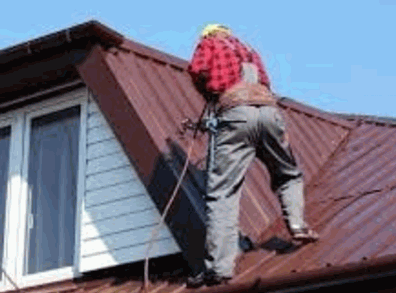
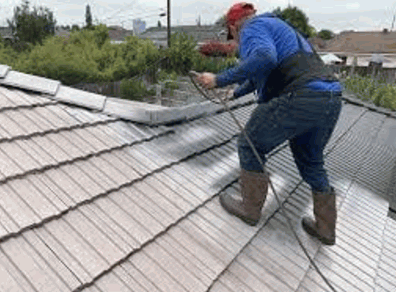
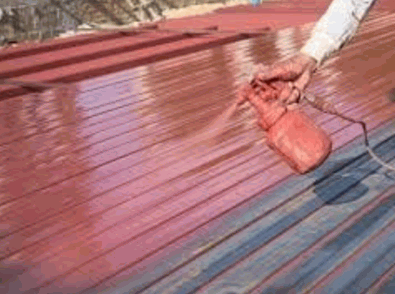
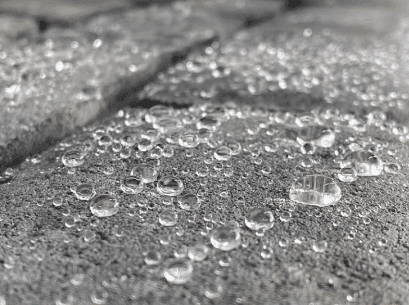
Jet washing provides an effective solution for the maintenance of the exterior of residential properties, including essential roof cleaning to manage moss and algae buildup. This article seeks to clarify the concept of jet washing and examine the reasons behind its increasing popularity among homeowners and experts in the UK. The benefits of jet washing roofs are numerous, including its capacity to eliminate dirt and debris, improve aesthetic appeal, prevent potential damage, and maintain the structural integrity of roofing tiles. However, it is important to acknowledge the associated risks, such as damage to tiles or shingles. This discussion will address the appropriate circumstances for jet washing, safe practices to follow, effective cleaning methods, and scenarios in which it may be advisable to refrain from this cleaning method in favor of alternatives like soft washing. Continue reading to gain comprehensive insights into this efficient cleaning technique.
What Is Jet Washing?
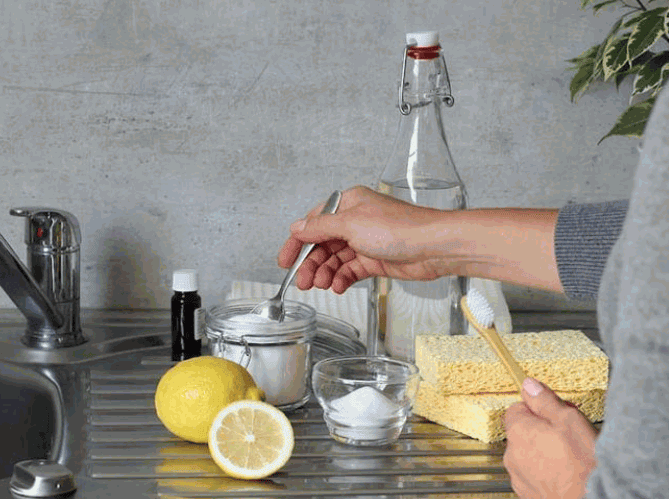
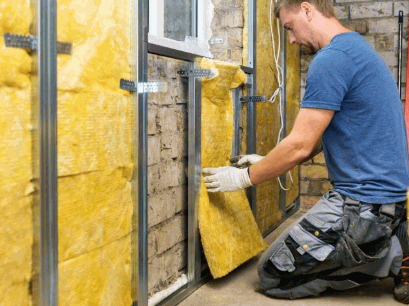
Jet washing, commonly referred to as pressure washing, is a highly effective cleaning method used for a variety of surfaces, including roofs, driveways, patios, and exterior walls. This technique employs high-pressure water to eliminate dirt, moss, algae, and lichen and other organic growths that can accumulate over time, thereby enhancing the overall appearance and extending the lifespan of a property.
Numerous professional cleaning services across the UK, particularly in regions such as Kent and London, provide specialised jet washing services tailored to safely and effectively clean roofs without causing any damage, often employing environmentally friendly biocide treatments. By utilising appropriate methods, such as soft washing, and equipment, these services ensure a comprehensive treatment for both residential and commercial properties, including gutters and other surfaces.
Why Do People Jet Wash Their Roofs?
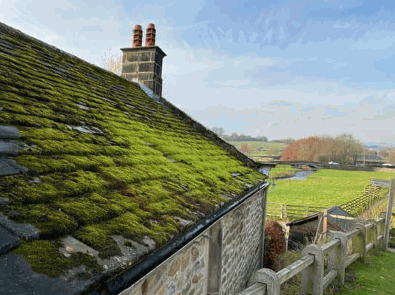
Individuals utilise jet washing services for their roofs primarily to uphold both the aesthetic appeal and structural integrity of their properties, ensuring long-lasting protection against moisture and damage. Over time, roofs may become susceptible to the accumulation of moss, algae, and dirt, resulting in unattractive appearances and the potential for long-term damage.
Engaging in regular maintenance through professional roof cleaning services addresses these issues promptly, thereby preserving the value of residential and commercial properties in regions such as Kent and London, while also preventing costly repairs. Implementing effective cleaning methods not only enhances the exterior appearance of a property but also mitigates moisture-related problems and organic growth that could incur significant repair costs.
What Are The Benefits Of Jet Washing A Roof?
Jet washing provides multiple benefits for homeowners and property managers seeking to maintain and improve the condition of their roofs, ensuring both aesthetic and functional improvements. One of the key advantages is its efficiency in eliminating dirt, moss, algae, and lichen, which can cause deterioration if not addressed promptly.
By engaging professional cleaning services, property owners can ensure that their roofs are properly maintained, thereby extending their lifespan, reducing the likelihood of costly repairs, and enhancing the property's overall value.
Additionally, these effective cleaning methods not only enhance the aesthetic appeal of the roof but also promote a healthier living environment by minimising organic growth, moisture retention, and other factors that may affect the house's interior.
Removes Dirt And Debris
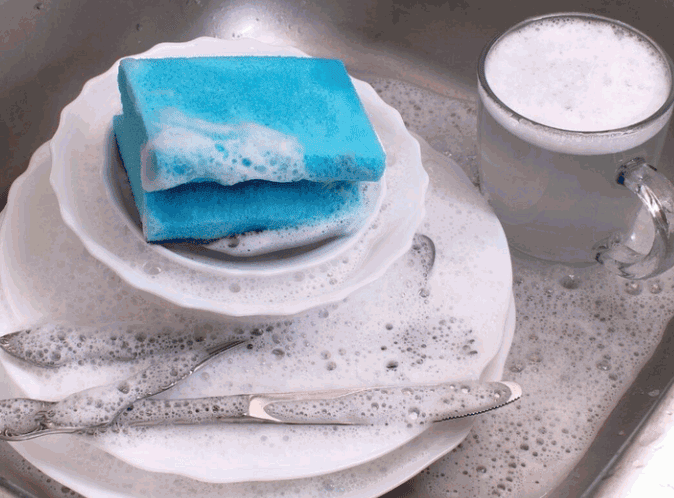
One of the primary advantages of jet washing is its exceptional capability to effectively remove dirt, debris, and organic growth from roof surfaces. Over time, roofs can accumulate grime, leaves, and other organic materials like moss and algae that not only diminish their aesthetic appeal but can also lead to significant maintenance issues. By employing high-pressure water jets, jet washing can thoroughly cleanse various roofing materials, ensuring that the surfaces remain clean and free of any obstructions that may impede proper drainage, such as clogged gutters.
This technique is not confined to roofs; it can also be applied to a variety of surfaces, including driveways, patios, exterior walls, and even concrete surfaces. The effectiveness of jet washing stems from its ability to penetrate deep into cracks and crevices where traditional cleaning methods may prove inadequate, offering a more thorough treatment. Regular cleaning is essential not only for visual appeal but also for preventing potential damage caused by the accumulation of mould, mildew, algae, and lichen.
Notably, professional services, such as those offered by Gleam Team and Trotta’s Power Washing, can ensure that:
Concrete surfaces can be restored to their original lustre.
Wooden decks benefit from the removal of grime that can trap moisture and lead to premature deterioration.
Clean surfaces contribute to a safer environment by reducing slip hazards.
To maximise the benefits of this cleaning method, it is advisable to schedule jet washing on a regular basis, adjusting the frequency according to climatic conditions, organic growth levels, and the surrounding environment.
Restores The Appearance Of The Roof
Restoring the appearance of a roof is a significant advantage of jet washing, making it an appealing option for homeowners aiming to enhance their property's kerb appeal and market value. The accumulation of moss, algae, lichen, and dirt can diminish the appearance of even the most durable roofing materials. Through professional jet washing services, these unsightly elements can be effectively removed, revealing the original beauty of the roof and improving the overall aesthetics of the property, which can also be beneficial for resale purposes.
The transformation resulting from a roof jet wash can be remarkable, often likened to a property's rejuvenation. For example, a roof that has been affected by years of grime may suddenly regain its vibrant colour, presenting a fresh and polished appearance, reminiscent of its original installation. Homeowners frequently discover that this restoration not only elevates the visual appeal of their property but also fosters a renewed sense of pride and satisfaction in their living environment, underscoring the importance of regular maintenance.
Ahead of this cleaning process, many individuals may overlook the condition of their roof; however, they are often astonished by the difference afterwards. A clean roof can significantly influence the overall perception of the home, contributing to an impression of excellent maintenance and inviting appearance.
Enhanced perceived property value and potential resale benefits
Psychological uplift for homeowners and increased pride in home ownership
Thus, opting for effective and thorough roof cleaning can lead to more than just a superficial aesthetic enhancement; it can also have a positive impact on the owner's mindset, underscoring the importance of maintaining their residence, as advocated by property experts.
Prevents Damage To The Roof
Preventing damage to the roof is a significant advantage of jet washing, making it an essential aspect of proper maintenance and long-term property care. Organic growth, such as moss, algae, and lichen, can retain moisture against the roofing material, resulting in deterioration and potentially costly repairs over time. By employing jet washing techniques, property owners can effectively eliminate these detrimental substances, ensuring that their roofs remain intact, functional, and visually appealing for many years.
Regular jet washing not only assists in removing organic buildup but also promotes the longevity of roofing materials, such as those made from slate, clay, or terracotta. Over time, neglecting roof maintenance can lead to severe issues such as leaks, structural damage, and increased moisture retention, which can be complex and expensive to rectify. Implementing an effective cleaning routine can significantly reduce moisture retention, thereby minimising the likelihood of biological growth that flourishes in damp conditions and reducing the risk of property damage.
A clean roof not only enhances the aesthetic appeal of the property but can also contribute to an increase in market value and energy efficiency.
Prevents costly repairs
Enhances property value
Improves energy efficiency
By investing in routine washing, property owners can protect their investment, ensuring a dry, safe, and visually appealing home for years to come.
While jet washing offers numerous benefits, it also presents certain risks that property owners must carefully consider, such as potential damage to delicate roofing materials. Improper techniques can cause damage to the roof's shingles, tiles, or slates, potentially resulting in costly repairs.
Furthermore, water damage may occur if water is directed into vulnerable areas, leading to leaks, increased moisture problems, and additional structural complications. Safety is another important concern, as individuals performing jet washing may be at risk of injury if appropriate precautions and safety measures are not taken.
Damage To Shingles Or Tiles
One of the primary risks associated with jet washing a roof is the potential damage it may inflict on roofing materials such as tiles or slates. High-pressure water can dislodge or crack these materials, creating vulnerabilities in the roof structure and increasing the risk of leaks, moisture retention, and subsequent damage. This concern is particularly pronounced for roofs constructed with older or more delicate materials such as clay or terracotta tiles, which may not be able to withstand the force of jet washing.
Considering these factors, it is imperative for homeowners to thoroughly assess the specific condition of their roof prior to selecting a cleaning method and consulting with experts. Different roofing materials, such as clay tiles, bitumen shingles, wooden shakes, and slate, respond variably to high-pressure washing. For example, while bitumen shingles may become brittle with age, clay tiles and terracotta are more susceptible to fracturing under excessive pressure. Roofs that have undergone wear and tear may already have existing weak points that could heighten the risk associated with jet washing, making a case for less invasive methods.
Understanding the material can help prevent potential damage and ensure long-lasting results.
Older roofs may require gentler cleaning methods, such as soft washing paired with biocide treatments.
Exploring alternative cleaning options, such as anti-fungicide and soft washing products, can yield more favourable results.
Failure to address any unnoticed damage could result in extensive and costly repairs, highlighting the necessity of considering both the roof material and its condition before undertaking any cleaning efforts, especially when using high-pressure methods common in areas like Kent and Surrey.
Water Damage To The Roof
Water damage presents a significant risk when jet washing a roof, particularly if the procedure is not carried out correctly. If high-pressure water is inadvertently forced into seams or cracks, it can lead to moisture accumulation within the roofing structure, resulting in rot and deterioration over time. This type of damage can be particularly insidious, as it may not be immediately apparent but can have severe consequences in the future, especially for homeowners in London and Sussex.
It is essential for anyone considering this maintenance task to understand the mechanics by which improper jet washing can lead to water damage. When using a pressure washer, incorrect angles can direct water into vulnerable areas, such as joints or weak points in roofing materials. Over time, moisture accumulation compromises the integrity of the roof, leading to potential leakage issues.
To mitigate these risks, adhering to proper techniques is imperative. The following precautions should be observed:
Always maintain an appropriate distance from the surface to prevent forcing water into seams.
Adjust the pressure settings according to the type of roofing material.
Inspect the roof for any pre-existing cracks or damage before commencing work.
Use safe lifting techniques and wear protective gear to prevent personal injury.
By implementing diligent practices and maintaining awareness, individuals can effectively reduce the risk of water damage and ensure the long-term maintenance of the roof.
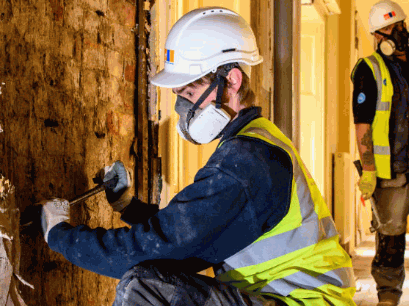
Injury Risk To The Person Performing The Jet Washing
Injury risk is a significant concern when engaging in jet washing, particularly for individuals who may lack experience with the equipment or the specific techniques necessary for safe operation.
To minimise accidents and ensure a secure working environment, it is essential to implement a range of safety measures. Individuals undertaking this task should wear protective gear, which includes safety goggles, gloves, and appropriate footwear to mitigate the risk of injury. Proper training in the use of jet washing equipment is not only advisable but essential; understanding how to operate the machinery safely can significantly reduce potential hazards.
Given the risks associated with high-pressure water streams, individuals who are not familiar with the intricacies of jet washing should consider employing professionals.
Use of safety gear, including:
Safety goggles
Protective gloves
Non-slip footwear
By prioritising safety through adequate training and appropriate equipment usage, the likelihood of accidents can be substantially reduced, ensuring a safer cleaning experience for all parties involved.
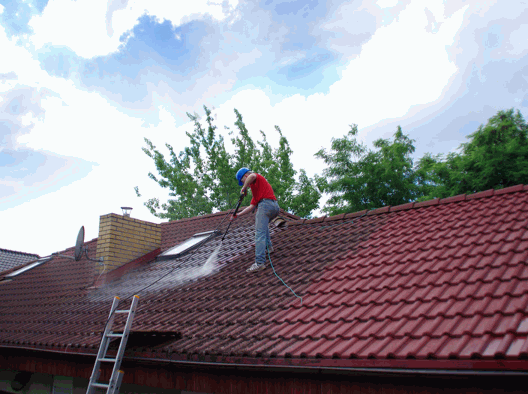
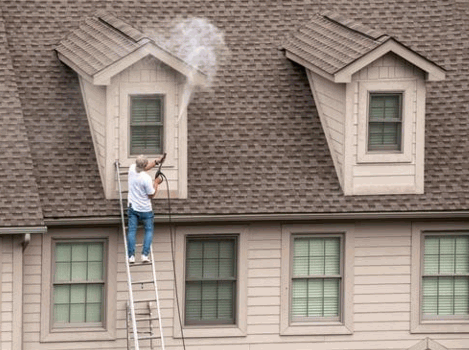
How To Safely Jet Wash A Roof?
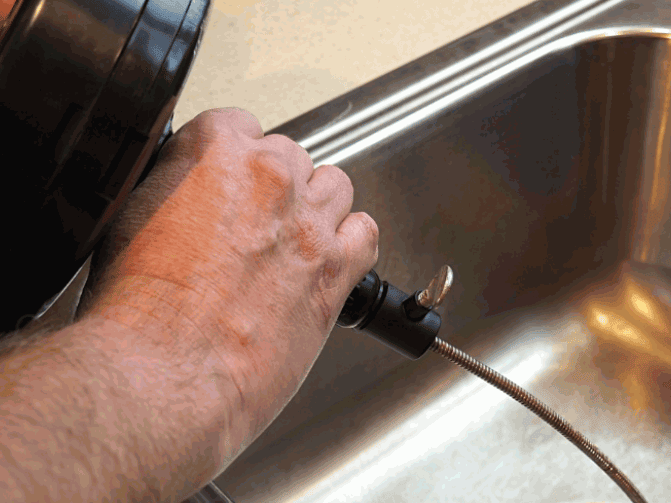
To safely perform roof jet washing, it is essential to adhere to specific guidelines that minimise risks and optimise the cleaning process. The initial step involves utilising the appropriate equipment specifically designed for this task, including pressure washers and nozzles that are compatible with the type of roofing material being cleaned.
Furthermore, selecting the correct pressure level is critical to prevent damage to shingles or tiles while effectively eliminating dirt and organic growth.
Use The Right Equipment
Utilising the appropriate equipment is essential for the safe and effective jet washing of a roof, as it directly influences both the cleaning results and the safety of the operator. High-quality pressure washers that are specifically designed for roofing applications typically feature adjustable pressure settings and specialised nozzles suitable for various materials, including slate, clay, and terracotta tiles.
When selecting the appropriate jet washing equipment, it is imperative to take into account the specific requirements of the roofing material. Adaptable pressure settings ensure that the cleaning process is not only efficient but also preserves the roof's structural integrity. For example, softer materials may necessitate lower pressure to avoid damage, while more resilient surfaces can withstand higher pressure levels.
Commercial-grade pressure washers: These are ideal for larger roofs that have accumulated extensive grime.
Rotary nozzles: These nozzles offer concentrated cleaning action and are particularly effective for intricate tile work.
Detergent injectors: These devices aid in breaking down stubborn stains and moss, thereby enhancing the efficiency of the cleaning process.
Along with selecting the correct equipment, operators should emphasise quality to ensure both longevity and reliability during operation.
Ultimately, a thorough understanding of the roofing material's characteristics combined with the appropriate jet washing tools is crucial for achieving a successful cleaning project.
Choose The Right Pressure Level
Choosing the appropriate pressure level when jet washing a roof is essential to ensure safety and prevent damage to roofing materials. For most roofs, a pressure range between 1500 and 2000 PSI is typically effective for removing dirt and organic growth without harming shingles or tiles. However, this range may vary depending on the specific material and condition of the roof.
When determining the optimal pressure for various roofing materials, it is important to consider several factors, including the type of material, its age, and its overall condition. For example, asphalt shingles generally require lower pressure levels, whereas metal roofs can typically endure higher pressures.
Utilising pressure that is excessively high may strip protective granules from shingles or fracture tiles, resulting in costly repairs. Conversely, applying pressure that is too low may not adequately eliminate stubborn stains or moss, leading to ineffective cleaning.
Therefore, it is advisable to:
Consult manufacturer guidelines to identify recommended pressure levels.
Conduct a test wash in a small, inconspicuous area.
Adjust the nozzle type to optimise pressure without causing damage.
By understanding these limitations and adhering to best practices, one can enhance the longevity of the roof, ensuring it effectively fulfils its intended purpose.
Start From The Top And Work Down
When conducting roof jet washing, it is advisable to initiate the process from the top and progress downwards. This approach ensures that dirt and debris are efficiently removed, preventing blockages in gutters or drainage systems. Furthermore, it mitigates the risk of excessive water accumulation on the roof, which can lead to moisture-related complications.
Employing a top-down cleaning technique not only optimizes the cleaning process but also minimizes the risks associated with roof maintenance. By addressing the roof from its highest points first, the likelihood of damaging tiles or underlying structures is significantly reduced. This method promotes a more effective removal of accumulated grime, moss, and other contaminants, thereby enhancing both the longevity and aesthetic appeal of the roof.
Encourages thorough cleaning of gutters.
Reduces the potential for mould development.
Improves water flow and drainage.
When executed correctly, this systematic approach allows for comprehensive cleaning while preserving the integrity of the property. It is considered a best practice that all homeowners and maintenance professionals should adopt.
Be Mindful Of The Roof Material
It is essential to consider the type of roof material when performing jet washing to ensure that the selected cleaning method is both appropriate and safe. Various materials, such as concrete, slate, and terracotta, exhibit different levels of durability and may necessitate specific pressure settings or techniques to prevent potential damage.
Understanding the significance of these variations is crucial for both homeowners and contractors. Each material not only responds differently to high-pressure water jets, but it also has unique maintenance requirements that contribute to its longevity.
For instance:
Concrete roofs are relatively durable; however, they may experience surface erosion if subjected to excessive pressure.
Slate roofs, while aesthetically pleasing, can be susceptible to cracking if the jetting technique is not applied with care.
Terracotta tiles, renowned for their visual appeal, often require soft washing to maintain their structural integrity.
These distinctions underscore the importance of engaging knowledgeable professionals who can accurately assess the condition of the roof and customise their jet washing approach accordingly, ensuring effective cleaning without compromising the roof's structure.
When Should You Not Jet Wash A Roof?
There are particular circumstances under which jet washing a roof is not recommended, primarily to prevent potential damage and ensure safety. If the roof is old or exhibiting signs of wear, the high-pressure washing may exacerbate existing problems, resulting in costly repairs. Local councils often advise consulting with professionals to assess the roof's condition first.
Furthermore, if the roof contains delicate features, such as rooflights or decorative elements, these may be adversely affected by the force of the high-pressure water stream. This is particularly true in regions like Kent or Surrey where weather conditions can vary significantly.
If The Roof Is Old Or Damaged
When a roof is aged or shows signs of damage, jet washing may not be the most suitable cleaning method due to the potential risk of exacerbating existing issues. High-pressure water can worsen problems such as cracks or loose tiles, leading to leaks and significantly increasing repair costs. In places like London and Sussex, where roofing styles vary, alternative methods are often recommended.
Homeowners should consider less invasive yet effective alternatives. For instance, a gentle soft washing technique uses low-pressure water combined with specialised cleaning solutions specifically designed to remove moss, algae, and dirt without compromising the integrity of the roofing material.
Other viable options include:
Hand scrubbing, which provides greater control and protection.
Using a leaf blower to remove debris without introducing moisture, a technique often endorsed by professionals.
Engaging a professional cleaning service that specialises in roof maintenance, ensuring both safety and proper care, who are known for their thorough surfaces cleaning services.
By adopting methods that prioritise careful handling over pressure washing, homeowners can maintain the durability and aesthetics of their roofs over time. This approach not only safeguards the roofing structure but also extends its lifespan, ultimately resulting in cost savings in the long run.
If There Are Delicate Features On The Roof
When a roof features delicate components, such as skylights, ventilation pipes, or intricate architectural details, jet washing is typically not recommended due to the risk of damage. High-pressure water can easily dislodge or break these elements, resulting in costly repairs and further complications.
The consequences of neglecting these delicate aspects can extend beyond cosmetic damage. Such neglect may also impact the roof's overall functionality, potentially leading to leaks or water penetration that could compromise the structural integrity. To prevent such issues, consider guidelines from the NFRC or Roof Tile Association.
To effectively maintain the roof while protecting its vulnerable components, it is advisable to consider alternatives such as:
Utilising a soft wash method that employs low-pressure water in conjunction with specialised cleaning solutions formulated for delicate surfaces.
Implementing hand scrubbing with gentle brushes to remove debris without risking damage.
Conducting periodic inspections to identify any wear or potential issues early on, before they escalate.
By prioritising gentle care, property owners can ensure that their roofs remain in optimal condition while avoiding the drawbacks associated with high-pressure cleaning methods.
If The Weather Conditions Are Not Ideal
If weather conditions are not favourable, it is advisable to postpone the jet washing of a roof, as adverse weather can significantly impact the effectiveness of the cleaning process. Local councils often provide seasonal recommendations for such maintenance tasks.
It is essential to consider factors such as humidity, temperature, and wind speed when planning the timing for this important maintenance task. For example, washing a roof on a hot, sunny day may cause the cleaning solution to dry too quickly, leading to ineffective removal of dirt and grime. In the UK, weather forecasts can be checked ahead of planning such tasks to ensure ideal conditions.
Additionally, windy conditions can result in debris being blown into the cleaned areas, thereby negating the efforts made. While a damp environment may generally aid in effective cleaning, it also poses safety concerns, as wet surfaces can become slippery.
Therefore, when planning a jet washing, it is prudent to monitor weather forecasts and select a time when conditions are stable and favourable, ensuring both safety and efficacy.
Roof leakage is a prevalent issue that is frequently underestimated, yet it can result in substantial damage if not promptly addressed. This article examines the nature of roof leakage, identifies common causes such as damaged shingles and clogged gutters, and outlines how to recognise the signs of such issues in residential properties. Furthermore, it offers practical strategies for preventing leaks and discusses various repair options, whether one opts for a do-it-yourself approach or engages the services of a professional. A thorough understanding of these factors can yield significant savings in both time and expenses, while ensuring the safety and dryness of one's home.
What Is Roof Leakage?
Roof leakage represents a significant concern within the roofing industry, frequently leading to substantial damage to buildings and jeopardising their structural integrity. This issue arises when water infiltrates the roof system due to various factors, including inadequate design, installation defects, poor workmanship, or the deterioration of roofing materials over time. Issues such as poor detailing and improper sealing can exacerbate the problem.
A comprehensive understanding of the complexities surrounding roof leakage, including the interaction of different roofing materials and construction technology, is essential for implementing effective building maintenance and prevention strategies. Failure to address these leaks can result in problems such as interstitial condensation, mould growth, and moisture trapped within the structure, which not only pose health risks but also necessitate prompt intervention.
By conducting thorough inspections and establishing robust maintenance programmes, including an inspection regime to identify roofing problems early, property owners can effectively mitigate the risks associated with roof leaks and extend the lifespan of their roofing systems.
There are several common factors that can contribute to roof leakage, potentially resulting in significant water ingress and damage over time. Understanding roof leaks causes is essential. These factors include:
Substandard workmanship during installation,
Insufficient slopes in the roofing structure, and
Problems with roof flashing that inadequately seals joints and edges.
Furthermore, the age of roofing materials can also play a role in the occurrence of leaks, as these materials may deteriorate and become less effective in withstanding temperature fluctuations and solar gain.
Identifying these causes is crucial for the implementation of effective roof maintenance and repair strategies.
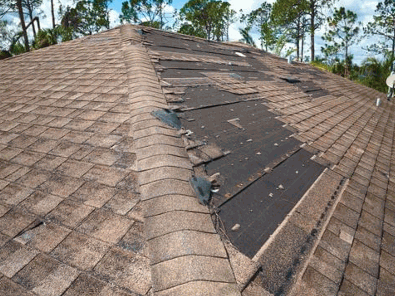
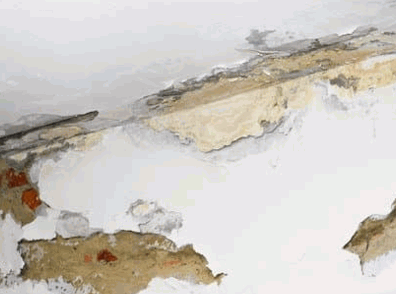
Damaged Or Missing Shingles
Damaged or missing shingles are significant contributors to roof leaks, as they compromise the integrity of the roofing system. When shingles are cracked, broken, or absent, moisture can easily penetrate the underlying layers, leading to water ingress and potential structural damage. This may also impact the thermal calculations of the building.
Regular inspections can identify these issues before they escalate, allowing for timely repair techniques that restore the roof's effectiveness.
The impact of these roofing faults extends beyond mere aesthetics; they can result in increased energy costs and expensive repairs if not addressed promptly. Roofing materials, such as asphalt or tile, are designed to function cohesively, and any disruption in this synergy can diminish overall performance. For example, the loss of shingles can expose the underlayment to harsh weather conditions and temperature changes, causing further deterioration.
Utilising materials that match existing shingles is essential for effective repairs. Additionally, adopting a maintenance programme that includes regular inspections can significantly enhance the longevity of the roof. These programmes not only focus on correcting visible defects, such as missing shingles, but also emphasise the proactive identification of early warning signs of potential issues, thereby preserving the overall integrity of the home's exterior.
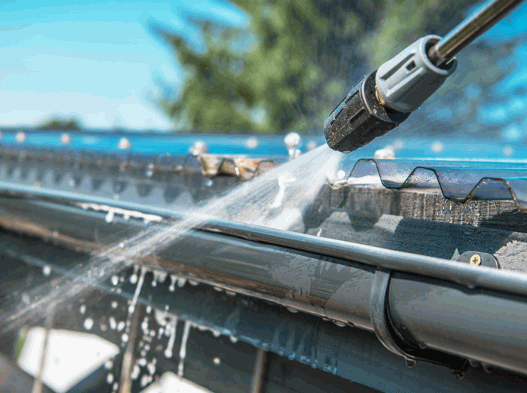
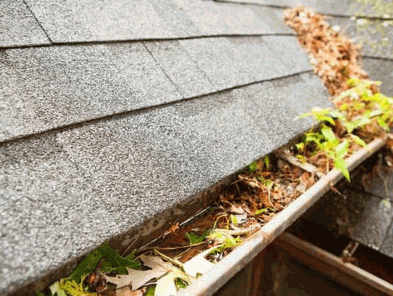
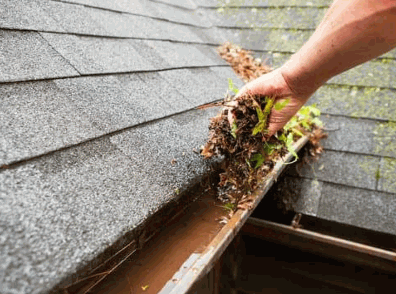
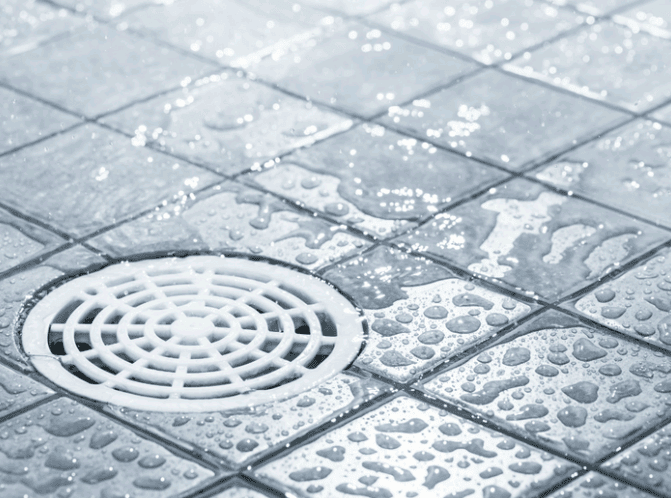
Clogged Gutters
Blocked gutters can lead to severe roof leaks by obstructing the proper drainage of rainwater, resulting in overflow and water accumulation on the roofing surface. This buildup not only increases the risk of water ingress but can also trap moisture beneath roofing materials, raising the likelihood of structural damage. Debris in gutters can exacerbate these issues. Regular roof maintenance, which includes thorough gutter cleaning, is essential in preventing these complications.
Effective drainage is crucial for protecting a home against costly repairs. When gutters are blocked, rainwater lacks a proper outlet, and the additional weight may compromise the structural integrity of the roof over time.
Investing in routine inspections and cleaning is vital to maintaining the integrity of both gutters and roofs. Homeowners should consider engaging the services of roofing specialists, who can also address issues like inadequate falls and improper alignment, as they possess the necessary expertise and tools to ensure that gutter systems are not only free from debris but also functioning at optimal levels.
Regular inspections can identify potential issues at an early stage.
Professionals can provide tailored maintenance plans to accommodate various roofing types.
They ensure that gutters are properly aligned and sloped for effective drainage.
By prioritising these maintenance practices, homeowners can significantly reduce the risk of future leaks and extend the lifespan of their roofs.
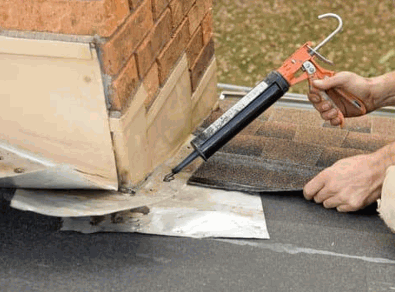
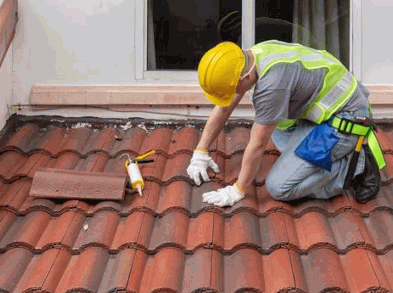
Cracked Flashing
Cracked flashing is a prevalent cause of roof leakage that often remains undetected until significant damage has occurred. Flashing plays a crucial role in directing water away from vulnerable areas, such as chimneys and roof valleys. When flashing becomes cracked, it can result in water ingress that compromises the integrity of the roofing system. Issues like valley seal failure and poor detailing can exacerbate the situation. Timely attention to flashing issues is essential for effective roof maintenance and for preventing more severe problems in the future.
The importance of flashing in a roofing system cannot be overstated, as it serves as a protective barrier that prevents water from infiltrating areas where two different surfaces converge. Proactive maintenance is imperative, given that the consequences of cracked or damaged flashing can escalate rapidly.
Homeowners should incorporate regular inspections into their roof care strategy, with a focus on potential trouble spots.
Routine checks can help identify early signs of wear and tear.
Timely repairs may involve resealing or replacing compromised flashing.
Investing in high-quality materials during repairs can significantly enhance longevity and performance.
By prioritising these actions, homeowners not only extend the lifespan of their roofing systems but also safeguard the integrity of their entire residence.
Poor Installation
Poor installation practices represent a primary cause of roof leaks, often stemming from insufficient training or oversight during the roofing process. Errors such as improper sealing, misaligned tiles, or incorrect use of roofing materials can create vulnerabilities that permit water infiltration. Construction defects like these can severely impact the integrity of the roof. To prevent these issues, it is imperative to engage qualified roofing specialists who adhere to established best practices in building maintenance and installation.
Neglecting proper installation techniques not only shortens the roof's lifespan but can also result in substantial repair costs in the future. Unqualified contractors may overlook critical aspects such as:
Ensuring that all seams are properly sealed to prevent moisture penetration.
Aligning tiles to establish an effective barrier against wind and rain.
Utilising high-quality materials that are appropriate for local weather conditions.
To maintain the integrity of the roof and protect the property, it is essential for homeowners to prioritise hiring experienced professionals who recognise that proper sealing is crucial for preventing leaks. Investing in expert installation ultimately enhances durability and provides peace of mind.
Age Of The Roof
The age of a roof significantly influences its susceptibility to leaks, as roofing materials naturally deteriorate over time due to exposure to temperature fluctuations and solar gain. Understanding the impact of roof age on leakage risk is essential for homeowners, as this factor not only affects their comfort but also their financial investment in the property. Membrane layers can also deteriorate, affecting roof performance.
Older roofs may develop issues such as moisture accumulation beneath the surface or compromised insulation values, which can lead to an increased risk of interstitial condensation and water ingress. Therefore, regular roof maintenance is crucial for extending the lifespan of roofing materials and for the early identification of potential problems. Planned maintenance, including checking for issues related to building expansion and structural connection, is essential.
Homeowners should remain vigilant regarding the signs of ageing roofing materials, which often include:
Cracked or missing tiles
Visible water stains inside the house
Increased energy bills due to inadequate insulation
Different types of roofing systems, such as asphalt tiles, metal, or slate, respond uniquely to ageing. The use of elastomeric membranes and bituminous membrane can also affect durability. For instance:
Roof Type
Effects of Ageing
Maintenance Tips
Asphalt Tiles
Membrane Technology
Granule loss and curling
Annual inspections; replacement when necessary
Metal
Temperature Changes
Corrosion and loose fastening
Regular cleaning and resealing
Slate
Structural Connection
Cracking and shifting
Prompt repairs of broken slates
Conducting routine inspections can significantly mitigate the risk of leaks, enabling necessary repairs to be performed before they escalate into serious issues. Investing in a proactive maintenance strategy not only protects the integrity of the roofing materials but also enhances the overall value of the property.
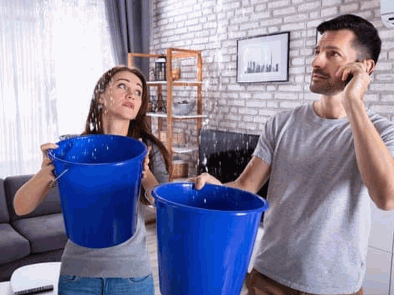
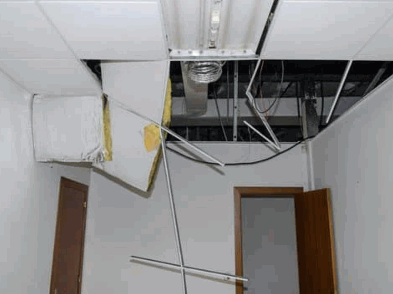
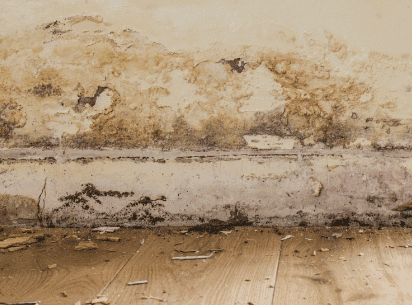
Signs Of Roof Leakage
Recognising the signs of roof leakage is essential for maintaining the structural integrity of a building and preventing extensive damage.
Common indicators include water stains on ceilings, which typically indicate that moisture has infiltrated the roofing system. A damp or musty odour may also suggest the presence of trapped moisture.
Furthermore, visible water drips and the growth of mould or mildew are clear signs that roof leaks necessitate immediate attention to avert further complications. Issues such as chimney leaks or problems in flat roofs can exacerbate these conditions.
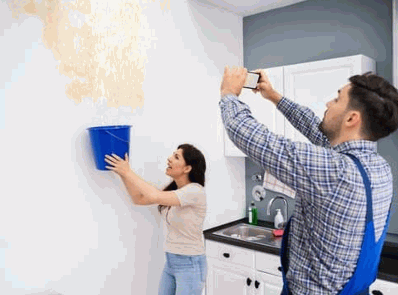
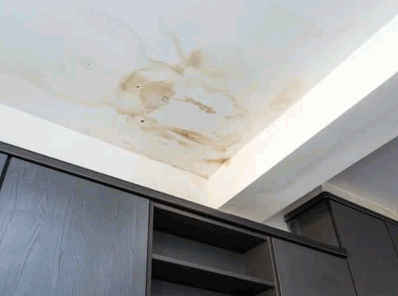
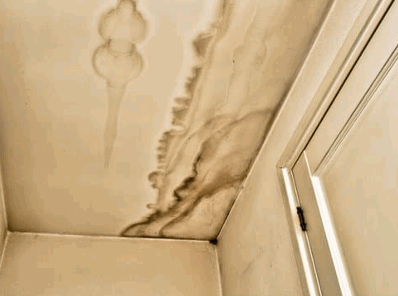
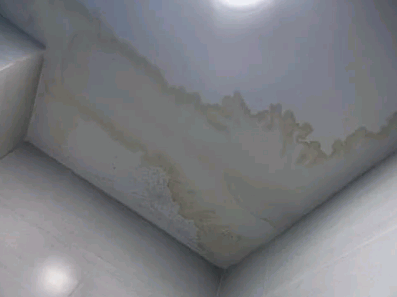
Water Stains On Ceiling
Water stains on the ceiling serve as a significant indicator of roof leakage, often signifying that moisture has permeated the roofing system. These stains can vary in size and colour, which reflects both the severity of the leak and the duration of moisture exposure. Early identification of these stains is critical for addressing the underlying roofing issues before they lead to more extensive damage.
Upon inspection, one may observe a considerable variation in the appearance of water stains, ranging from small brown spots to larger, more concerning discolourations. The varying shades may indicate the age of the leak, while the shape and size often suggest the extent of the damage concealed within the ceiling. Timely detection of these signs is essential for preserving the integrity of the entire roofing structure.
Common causes of such stains include:
Faulty flashing around vents and chimneys
Blocked gutters that allow water to back up
Damaged tiles or slates that have deteriorated due to wear and tear
Given the potential risks associated with untreated leaks, it is highly advisable to seek professional assistance for inspection and repairs. A qualified roofing expert can provide a comprehensive evaluation and necessary remediation strategies to protect the property effectively.
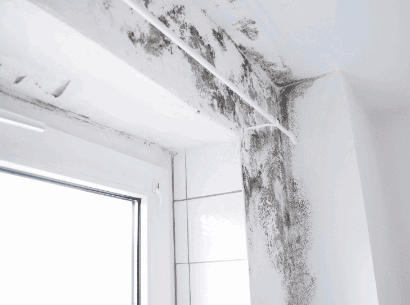
Damp Or Musty Smell
A damp or musty odour within a building can be an indication of roof leakage, suggesting that moisture is trapped within the roofing system or structure. This smell often results from mould growth, which thrives in wet environments and poses significant health risks. It is essential to address this issue promptly to maintain a healthy indoor environment and prevent further damage to the roofing materials.
The presence of such odours should not be disregarded, as they may signal a more serious underlying problem. Specifically, standing water and trapped moisture can promote hazardous mould growth, leading to potential respiratory issues for occupants.
Health Risks: Prolonged exposure to mould can result in allergies and respiratory complications.
Structural Damage: Over time, persistently moist conditions can compromise the structural integrity of a building, leading to costly repairs.
Consequently, it is advisable to investigate the source of the odour without delay. Building owners should consider conducting a comprehensive inspection of their roofing systems to identify any leaks and ensure that the materials remain intact and function as intended. Taking preventive measures can help mitigate the risks associated with moisture and protect both health and property.
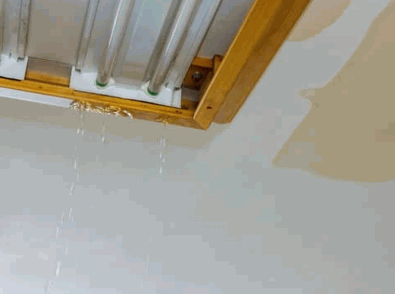
Visible Water Drips
Visible water drips are among the most concerning indicators of roof leakage, signifying that water is actively infiltrating the roofing system. These drips may manifest during rainfall or as snow melts, underscoring the urgency of addressing the underlying issues that contribute to water ingress. Implementing effective leak detection methods is crucial for identifying and repairing the source of the problem.
For property owners, the presence of water drips often indicates more than a minor concern; it acts as a visible warning that could lead to significant structural damage if not addressed in a timely manner. Understanding the implications of these signs is essential, as they may include potential mould growth and deterioration of building materials.
To effectively combat these issues, several leak detection techniques may be employed:
Utilising moisture meters to assess areas of dampness, especially around expansion joints and other potential weak points.
Conducting infrared thermal imaging to identify temperature variations that may indicate leaks.
Employing water tracing dye to pinpoint specific locations of water ingress.
The importance of engaging professional inspections cannot be overstated. Skilled professionals possess specialised knowledge and advanced tools that facilitate a comprehensive assessment, making it easier to implement timely solutions that preserve the integrity of the property.
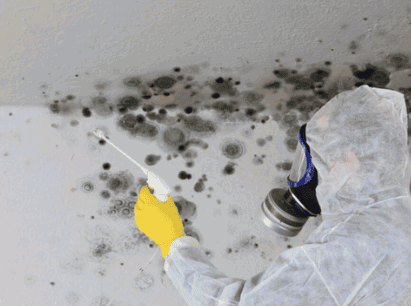
Mold Or Mildew Growth
Mould or mildew growth within a building serves as a significant indicator of roof leakage, often resulting from prolonged exposure to trapped moisture in the roofing materials. Such growth can compromise air quality and pose considerable health risks to occupants. It is essential to identify and address the source of moisture, not only to eliminate mould but also to protect the overall structural integrity of the building.
Excess moisture is frequently an overlooked yet prevalent issue that fosters the development of these harmful fungi, leading not only to aesthetic concerns but also to serious structural damage and health implications. Factors such as inadequate ventilation, improper roofing installation, or damage caused by severe weather can exacerbate this problem.
Health Risks: Exposure to mould can lead to respiratory issues, allergies, and other health complications.
Structural Integrity: Prolonged exposure to mould may weaken building materials, increasing the risk of collapse or necessitating extensive repairs.
Prompt action to identify leaks and the implementation of preventive measures, such as regular maintenance checks and adequate ventilation systems, are crucial for promoting a safe indoor environment and preserving property value.
Preventing Roof Leakage
Preventing roof leaks is crucial for maintaining the integrity and longevity of roofing systems. Implementing effective strategies can result in substantial cost savings for property owners in terms of repairs.
Key preventative measures include regular roof maintenance, which involves scheduled inspections by roofing specialists to identify potential issues before they escalate. Establishing comprehensive maintenance programmes can ensure that roofs are adequately cared for, allowing for the prompt and effective resolution of any damage.
Regular Roof Maintenance
Regular roof maintenance is a critical component in preventing roof leakage and ensuring the longevity of roofing materials. Engaging roofing specialists to conduct comprehensive inspections and implement a planned maintenance schedule can identify vulnerabilities and address them proactively before they escalate into significant issues. This approach not only extends the lifespan of the roof but also enhances the overall performance of the building.
Establishing a regular inspection schedule is essential for maintaining the structural integrity and lifespan of roofing materials over time. Most experts recommend that property owners have their roofs inspected biannually, preferably during the spring and autumn seasons, to identify any damage that may have occurred due to adverse weather conditions or poor design.
Key tasks involved in these routine inspections include:
Checking for missing, damaged, or loose tiles
Inspecting flashings and seals around skylights and chimneys
Cleaning gutters and downpipes to ensure proper water flow
Observing for any signs of wear or decay in roofing materials
By involving roofing specialists, property owners can obtain invaluable insights that extend beyond basic maintenance. These professionals can provide advanced solutions for enhancing durability and safety, ensuring that the roof continues to fulfil its primary function effectively.
Ultimately, prioritising roof maintenance serves to protect the entire property against potential hazards, preserving both its value and the comfort of its occupants.
Keep Gutters Clean
Maintaining clean gutters is essential for preventing roof leakage, as clogged gutters can obstruct proper drainage and lead to water pooling on the roof surface. Regularly clearing debris and ensuring that gutters function effectively will help maintain proper water flow and reduce the risk of water ingress. This simple yet critical aspect of roof maintenance can significantly enhance the overall performance of roofing systems.
To ensure that gutters are functioning optimally, homeowners should establish a routine maintenance schedule, ideally checking gutters at least twice a year. Regular cleaning can greatly decrease the likelihood of unwanted clogs caused by leaves, twigs, and other debris that may accumulate over time. Consider the following recommendations for effective gutter maintenance:
Install gutter guards: These devices can help filter out debris while allowing water to flow freely.
Check downpipes: Ensure that downpipes are clear and direct water away from the foundation.
Inspect joints and seams: Look for any signs of wear or leaks that may allow water to escape.
By maintaining clean gutters, homeowners not only protect their roofing systems but also extend their lifespan, ultimately safeguarding their properties from potential water damage.
Address Any Damage Promptly
Promptly addressing any damage is a crucial step in preventing roof leakage and maintaining the integrity of roofing systems. Minor issues, such as missing tiles or cracked flashing, can rapidly escalate into significant problems if not addressed in a timely manner. Implementing effective repair techniques and conducting regular evaluations can mitigate risks and extend the lifespan of the roof.
By taking swift action to repair minor damage, homeowners can avoid costly repairs and preserve the overall health of their roofing systems. Regular inspections are instrumental in identifying potential issues before they worsen, allowing for a well-informed approach to maintenance. Proactive care not only enhances the durability of the roof but also contributes to greater energy efficiency within the home.
Timely repairs can prevent structural deterioration.
Maintaining a watertight seal is essential for preventing leaks.
Using quality materials for repairs fosters longevity.
The significance of established repair strategies cannot be overstated. These strategies provide the foundation for a comprehensive roof maintenance plan, offering peace of mind for homeowners.
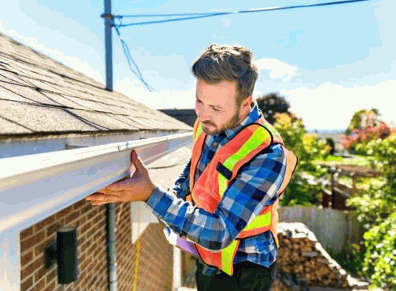
Consider A Roof Inspection
Considering a roof inspection is essential for identifying potential issues that could result in roof leakage. Engaging roofing specialists for regular inspections enables property owners to detect vulnerabilities early and implement effective leak detection measures. This proactive approach not only enhances the longevity of the roof but also ensures the safety and comfort of building occupants.
Regular roof inspections are critical in maintaining the overall health of a property, as they facilitate the identification of minor problems before they escalate into significant issues. By relying on qualified experts, property owners benefit from comprehensive assessments that encompass various necessary evaluations, often provided by design specialists.
Early detection can result in substantial cost savings by preventing expensive repairs and extending the lifespan of roofing materials. Roofing specialists possess the expertise and tools required to monitor wear and tear, assess drainage systems, and ensure that flashing and seals remain intact.
Enhanced safety through early intervention.
Prevention of moisture intrusion and mould growth.
Increased property value through well-maintained roofing.
Ultimately, the decision to schedule regular inspections contributes to the creation of a secure environment and fosters peace of mind for all individuals occupying the building.
Repairing Roof Leakage
Repairing roof leaks necessitates a thorough assessment of the situation to ascertain whether do-it-yourself methods or professional repair services are more suitable. Although many homeowners may choose temporary solutions, such as using roofing tape or sealants to patch leaks, it is generally recommended to seek professional assistance for permanent solutions that effectively address the underlying cause of the issue.
Properly executed repairs can significantly enhance the integrity of the roofing system and mitigate the likelihood of future leaks.
DIY vs Professional Repair
When addressing roof leakage, homeowners frequently encounter the decision of whether to undertake a DIY repair or to hire professional roofing specialists. Although DIY repairs may initially appear cost-effective, they often lack the expertise and quality assurance that professional repairs provide, which utilise advanced techniques and materials. A comprehensive understanding of roofing systems is crucial for making an informed decision that ensures lasting results.
The allure of saving money through DIY solutions can be compelling; however, this approach frequently neglects the essential expertise required for a thorough and effective repair. Given the complexity of roofing systems, attempting repairs without the appropriate knowledge can lead to more significant issues in the future.
Pros of DIY Repair:
Cost-effective
Immediate action can be initiated
Opportunity to acquire valuable skills
Cons of DIY Repair:
Risk of improper installation
Potential for incomplete repairs
Safety hazards
Conversely, hiring professionals guarantee that all aspects of the repair are managed with diligence and care. Professional assessments take into account the entire roofing system, allowing for the identification of underlying problems that may not be immediately recognisable to the untrained eye.
Pros of Professional Repair:
Expertise ensures high-quality results
Longevity of repairs
Peace of mind
Cons of Professional Repair:
Higher upfront costs
Potential scheduling delays
Ultimately, the decision between DIY efforts and hiring specialists significantly influences the effectiveness of the repair. Long-term value is often found in entrusting the task to experienced professionals.
Temporary vs Permanent Solutions
When addressing roof leakage, it is crucial to distinguish between temporary and permanent solutions to ensure effective repairs. Temporary solutions, such as the application of tar or adhesives, may offer short-term relief; however, they frequently fail to address the underlying issues causing the leaks, which can lead to recurring problems. In contrast, permanent solutions necessitate comprehensive repair techniques that rectify the root causes of roofing issues and enhance the overall durability of the system.
Selecting the appropriate approach can significantly influence both immediate comfort and long-term financial investment. While temporary solutions may appear attractive due to their ease of application and lower initial costs, they often prove inadequate as they do not address deeper concerns, such as structural weaknesses or improper drainage.
Conversely, permanent repairs involve a thorough evaluation of the roofing system, facilitating the identification of vulnerabilities. This process includes methodologies such as:
Inspecting for damaged tiles or slates
Assessing the integrity of flashings and seals
Identifying potential drainage issues that could result in accumulation
By investing in permanent solutions, one can not only resolve the immediate symptoms of leakage but also prevent costly repairs in the future, thereby promoting a resilient roofing structure.
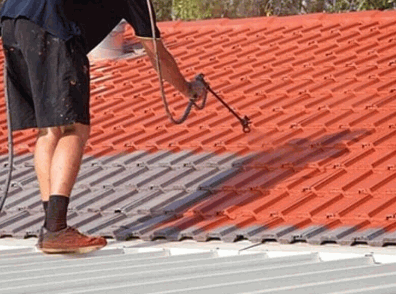
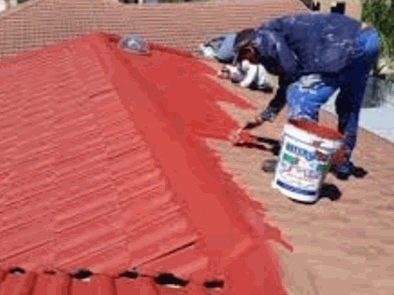
Painting a roof may initially appear to be an unconventional home improvement project; however, it presents numerous benefits that extend beyond mere aesthetics. In addition to enhancing curb appeal, painting a roof provides protection against severe weather conditions and can improve energy efficiency. A new coat of paint has the potential to significantly enhance both the functionality and appearance of the roof. This guide outlines the necessary materials, step-by-step preparation, and application techniques. Additionally, it includes recommendations for maintaining the newly painted roof, ensuring its longevity and durability over time.
Why Should You Paint Your Roof?
Painting a roof, whether it be on residential properties or commercial buildings like hospitals, hotels, and churches, offers numerous benefits beyond aesthetics.
Painting a roof not only enhances the aesthetic appeal of residential and commercial properties but also provides essential protection against various weather conditions, ensuring longevity and durability. A properly painted roof contributes to energy efficiency by reflecting ultraviolet rays, which helps maintain a comfortable indoor temperature and reduces the need for excessive heating or cooling. Additionally, the use of reflective coatings on residential and commercial roofs can help in further improving energy efficiency.
Improves Aesthetics
Painting a roof with quality materials, such as those from Nutech or Colorbond, can significantly enhance the visual appeal and durability of the structure.
One of the most immediate benefits of painting a roof is the substantial enhancement of aesthetics, as a fresh coat of paint can significantly revitalise the overall appearance of a residence.
Plus rejuvenating the structure's visual appeal, selecting the appropriate colour can greatly influence the overall ambience and kerb appeal of the property. Homeowners are often presented with a wide array of options when determining the ideal hue.
Among the popular choices, neutral shades such as beige or grey provide a classic aesthetic, while more vibrant options like deep blue or bold red can infuse character and distinction. Each colour selection reflects the homeowner's personal style and may even affect the perceived value of the home.
Earthy tones harmonise seamlessly with natural surroundings.
Lighter colours can create the illusion of a larger space in smaller homes.
Darker shades can highlight architectural details effectively.
Ultimately, the decision should achieve a balance between aesthetic aspirations and practical considerations, emphasising the importance of utilising high-quality materials to ensure durability and a refined finish. Homeowners and commercial property owners alike should consider the long-term benefits of using roof coating products from trusted brands like Nutech, Mirka, Norglass, and Murobond to ensure the longevity of their roofs.
Protects From Weather Damage
Painting a roof serves as a protective barrier against weather-related damage, significantly extending its lifespan by preventing issues such as corrosion and mould growth.
Plus offering physical protection, roof paint provides excellent UV resistance, safeguarding the roofing material from degradation caused by the sun's harsh rays over time. The appropriate coating can reflect sunlight, helping with the regulation of the building's internal temperature and thereby reducing energy costs.
This protective layer also enhances the roof's resilience against extreme weather conditions, including heavy rain, wind, and hail, ensuring that the structure remains intact and free from leaks.
Regular inspections enable homeowners and commercial property owners to identify any signs of wear and tear at an early stage. Scheduled maintenance, such as the reapplication of paint and surface preparation, can revitalise the protective qualities of the roof. Engaging with a roofing professional ensures that the inspection and maintenance are thorough and effective.
Ultimately, maintaining the integrity of these coatings not only preserves the condition of the roof but also enhances the overall durability of the property. Homeowners should prioritise routine inspections and timely maintenance to fully benefit from the protective properties of roof paint.
Increases Energy Efficiency
An often-overlooked benefit of painting a roof is its potential to enhance energy efficiency by reflecting solar heat, which helps maintain a comfortable indoor environment regardless of external weather conditions.
When considering a roof paint upgrade, it is essential to understand how various colours and materials can significantly influence energy efficiency. For instance, lighter colours tend to reflect more sunlight than darker shades, thereby reducing the amount of heat absorbed by the roof. By choosing reflective coatings from brands like Colorbond, homeowners can establish a thermal barrier that contributes to a notable reduction in indoor temperatures.
Cost Savings: Reduced energy consumption for cooling can lead to lower energy bills for homeowners.
Longevity: High-quality reflective paints can extend the lifespan of roofing materials by providing protection against UV damage.
Comfort: A cooler home results in increased comfort levels throughout the year.
Selecting the appropriate roof paint colour and material not only enhances a home's aesthetic appeal but also offers substantial cost savings on energy bills and improves overall comfort. Using high-quality products such as Acrylic Roof Tile Paint from reputable brands ensures that the roof remains durable and visually appealing.
What Materials Do You Need For Painting A Roof?
To successfully paint a roof, it is imperative to gather the appropriate materials and equipment. This preparation ensures a smooth and efficient process that adheres to safety standards and achieves high-quality results.
Paint
Selecting the appropriate paint is essential for ensuring durability and effectiveness; options such as acrylic and water-based paints provide excellent coverage and longevity. Brands like Acrylic Roof Tile Paint and Colorbond offer products specifically designed for roof painting, ensuring that the job is done efficiently and effectively.
Acrylic paints are particularly esteemed for their resilience and capacity to endure harsh weather conditions, thereby making them an optimal choice for various roofing applications. In contrast, water-based paints offer ease of application and cleanup, which can be beneficial for individuals undertaking DIY projects. The decision between these paint types often hinges on factors such as the specific roofing material, regional climate, and the desired finish. Professional brands like Colorbond and Nutech offer products that cater to different needs and ensure high-quality results.
By understanding their unique properties, users can choose the most suitable option that meets their requirements.
Acrylic Paint Advantages: Excellent UV resistance, flexibility, and long-lasting colour.
Water-Based Paint Advantages: Eco-friendly, low VOCs, and quick drying time.
Ultimately, evaluating the performance characteristics of each type is critical for making an informed decision that results in an aesthetically pleasing and durable roof. Consulting with a roofing professional can also provide valuable insights on the best painting method and materials to use for your specific needs.
Primer
The application of a high-quality primer prior to painting a roof is essential for proper surface preparation, which ensures optimal adhesion and coverage. Using a power washer to clean the roof and clean tiles beforehand can significantly enhance the effectiveness of the primer and paint.
Neglecting this critical step can compromise the longevity and effectiveness of the roofing paint. A primer serves to seal the surface while creating an ideal base that enhances the performance of the topcoat.
Several types of primers are suitable for various roofing materials, including:
Acrylic Primers: These are excellent for a range of surfaces, offering flexibility and long-lasting adhesion.
Oil-based Primers: These are ideal for rust prevention and oil-based finishes, providing a durable foundation.
Emulsion Primers: These are particularly suitable for quick drying and ease of application, especially on new wood or previously painted surfaces.
The use of a primer is necessary not only for achieving optimal results but also for preventing issues such as peeling, blistering, and uneven colour distribution. Ultimately, selecting the appropriate primer is crucial in ensuring that the roofing project endures the test of time and various environmental factors. Additionally, preparing the surface with a power washer and ensuring a clean roof are vital steps for effective primer application.
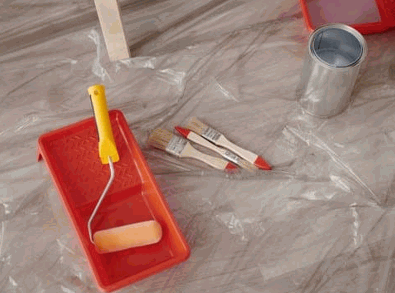
Brushes And Rollers
Utilising the appropriate tools, such as brushes, rollers, and paint sprayers, is essential for effective paint application, ensuring precision and consistency across the surface of the roof.
The decision between brushes and rollers largely depends on the specific requirements of the painting task at hand.
Brushes are particularly well-suited for detailed work, allowing access to tight corners and intricate areas, thereby ensuring comprehensive coverage. While they provide a smooth finish, brushes can be labour-intensive, especially over larger areas.
In contrast, rollers are designed to enhance efficiency, facilitating broader strokes that can cover extensive surfaces swiftly. However, they may not achieve the same level of detail in confined spaces.
When to use brushes: For trim, edges, and textured surfaces.
When to use rollers: For flat, expansive areas to accelerate the application process.
To achieve optimal results in roof painting, it is crucial to select the appropriate sizes and types of tools. Smaller brushes (1-2 inches) are ideal for edges, while larger rollers (9-12 inches) can expedite the filling of larger sections. Using a paint sprayer can also help achieve a smooth and even application, particularly on larger roof areas.
Additionally, it is important to consider the type of paint being utilised, as different formulations may necessitate specific tools to achieve a flawless finish. Consulting with a roofing professional can provide insights on the best painting method and the most suitable tools for the job.
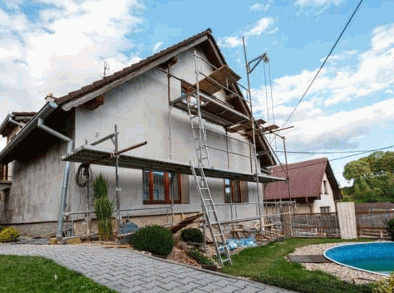
Ladder Or Scaffolding
To safely access the roof during the painting process, it is essential to utilise reliable equipment, such as a sturdy ladder or scaffolding that complies with safety standards. Additionally, wearing a safety harness and other safety equipment is crucial to prevent accidents and ensure a secure working environment.
When undertaking a project to paint the roof, safety considerations become paramount. The selection of appropriate equipment is crucial, particularly when taking into account the height of the roof. Using ladders that are too short may necessitate precarious reaching, whereas excessively tall ladders can create stability issues, especially in industrial roofs.
It is recommended to select a ladder with the appropriate height rating and to ensure it is positioned at a safe angle, ideally 75 degrees. Employing scaffolding can provide an additional layer of safety by offering a stable platform and enhanced overall support, especially when working on construction industry projects.
To ensure safety, consider the following guidelines:
Check for stability: Ensure that the ground is even and firm before setting up your ladder or scaffolding.
Secure your equipment: Utilise stabilisers or tie-downs as necessary, particularly in windy conditions.
Regular inspections: Inspect ladders and scaffolding for any signs of wear or damage before each use.
By taking the time to thoroughly assess and prepare the work environment, one can significantly reduce risks associated with painting the roof.
Safety Equipment
Prioritising safety during roof painting is essential, and the use of appropriate safety equipment, such as safety harnesses, plays a significant role in minimising the risk of accidents, particularly when dealing with asbestos materials.
The implementation of safety equipment ensures that both contractors and homeowners can maintain a sense of security throughout the project. It is essential to select and regularly inspect necessary gear, which includes:
Safety Harness: This equipment is crucial for reducing the risk of falls, particularly on steep roofs.
Helmets: Protecting against potential head injuries from falling objects is of utmost importance.
Footwear: Non-slip shoes with adequate grip are recommended to prevent slips on wet or uneven surfaces.
By adhering to established safety protocols, such as properly securing ladders and utilising appropriate scaffolding, individuals can enhance their protection and mitigate hazards. Observing these guidelines not only safeguards the contractor but also provides reassurance to the homeowner, fostering a collaborative environment conducive to the smooth progression of projects.
How To Prepare Your Roof For Painting?
Preparing a roof for painting involves several essential steps that ensure the surface is clean, undamaged, and suitably prepared for optimal paint application. This process is vital for extending the lifespan of roofing materials.
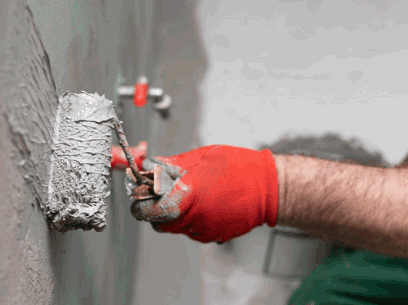
Clean The Roof
The initial step in preparing a roof for painting is to conduct a thorough cleaning, which can be effectively accomplished using a pressure washer to eliminate dirt, debris, and mold.
Once the surface is free from any accumulation, it is imperative to focus on the details to ensure a proper paint application. This involves paying close attention to the various materials that comprise the roof, such as tiles, shingles, or metal sheets.
For tile roofs, a thorough scrubbing with a mixture of water and a mild detergent, followed by rinsing, can yield significant improvements. In the case of metal roofs, employing a cleaning solution that includes a rust inhibitor serves not only to clean but also to protect the surface against future corrosion. Additionally, using Acrylic Roof Tile Paint can enhance UV protection and prolong the lifespan of the roof.
Regular cleaning prevents the build-up of dirt and moss, which can lead to damage over time.
For a more intensive clean, utilising a soft-bristle brush in conjunction with the pressure washer can effectively dislodge stubborn grime without harming the surface.
Maintaining a clean roof enhances its lifespan, thereby reducing the necessity for early repairs or premature replacement.
A clean surface facilitates better adhesion of the paint, which directly influences the durability and overall appearance of the finished product. While the cleaning process may appear daunting, the long-term benefits for the longevity of the paint job and the overall health of the roof are certainly worthwhile.
Before applying paint, it is imperative to conduct a thorough inspection of your roof for any damage and to perform necessary repairs to ensure a smooth surface and proper adhesion.
Neglecting potential issues may result in more significant problems in the future, affecting not only the roof but also the integrity of the entire home. Common types of damage include missing or cracked tiles, leaks, and issues related to mould or mildew.
Identifying these problems early can save homeowners considerable amounts of money and stress. Signs to look for include:
Water stains on ceilings
Granules from roof tiles collected in gutters
Visible cracks or splits in tiles
Dark spots indicative of mould growth
Once these issues are identified, it is crucial to address them promptly. Repairing roof tiles may involve replacing or securing any loose tiles, patching cracks with suitable materials, and ensuring that the underlying structure is sound.
By attending to these repairs prior to the painting process, homeowners can enhance both the longevity and aesthetic appeal of their roofs, utilising products like Nutech and Colorbond.
Protect Surrounding Areas
To ensure a clean and professional paint application, it is essential to protect surrounding areas from paint splatter and debris during the roofing project.
Planning ahead can significantly reduce the amount of cleaning up required upon project completion. When preparing to paint, it is vital to implement simple yet effective measures, such as using dust sheets and masking tape. Using these materials not only safeguards the surfaces in the work area but also facilitates a more efficient painting process.
The following steps are recommended for optimal preparation:
Begin by removing furniture and other items that may obstruct access or be at risk of damage from paint.
Cover floors and larger furniture pieces with dust sheets, securing them in place with masking tape to prevent any slips.
Mask off areas such as window frames, skirting boards, and vents to ensure clean edges and to prevent paint from entering unintended areas.
By thoroughly executing these precautions, the challenges associated with post-painting cleaning up can be minimised, resulting in a higher quality finish and reduced frustration upon project completion, especially when using high-quality products like Mirka and Murobond.
Step-by-Step Guide To Painting Your Roof
Painting a roof requires a systematic approach that can be outlined in a step-by-step guide. This methodology ensures that each phase is carried out with precision, resulting in a well-finished and aesthetically pleasing roof, using tools like paintbrush and Mirka abrasives.
Apply Primer
The initial step in the painting process involves the application of a high-quality primer, which is essential for ensuring proper adhesion and uniform coverage of the paint, especially for UV protection.
Effectively applying primer requires several key techniques that can significantly enhance the final outcome. To achieve a consistent layer, it is important to carefully select the appropriate primer based on the surface and the type of paint intended for use. Subsequently, employ a roller or brush that is specifically designed for the surface material, starting at the corners and edges before proceeding to cover larger areas.
Ensure that the surface is clean and dry, removing any dust or grease.
Commence with a thin coat, applying it evenly to prevent drips.
Once the primer has been applied, allowing it to dry properly is critical; this ensures that the paint adheres effectively without the risk of peeling or bubbling later. Depending on the humidity and temperature conditions, it is advisable to allow a minimum of 1-2 hours before applying the paint to achieve optimal results.
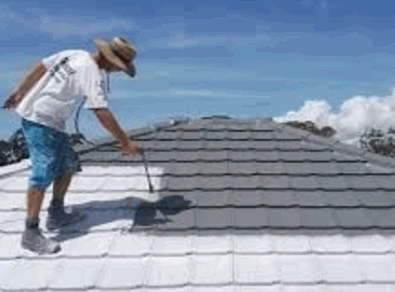
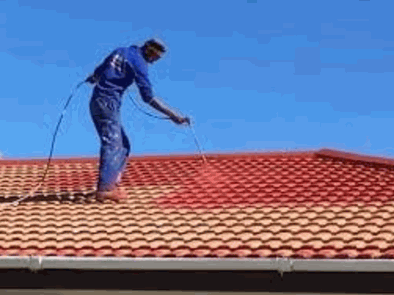
Paint The Roof
Once the primer has dried, the subsequent step involves applying the paint using the selected method, ensuring even coverage and a professional finish on the roof.
Selecting the appropriate application method is essential for achieving the desired results. The following are three common techniques:
Brush: This method is ideal for precision work, particularly in corners and intricate details. Its advantages include enhanced control and versatility; however, it can be time-consuming and labour-intensive, often necessitating multiple coats for optimal coverage.
Roller: This application technique efficiently covers large areas, making it a preferred choice for flat surfaces. While it provides a smooth finish, it may leave unpainted spots in textured areas unless used with care.
Sprayer: This method is suitable for a rapid and even coat, especially on uneven surfaces. It can easily reach challenging spots; however, it requires more preparation and safety measures due to potential overspray.
To achieve a consistent finish, regardless of the chosen method, it is important to ensure that the paint is thoroughly mixed, to work in manageable sections, and to maintain a wet edge to blend strokes seamlessly. Consider using Norglass and Murobond paints for optimal results.
Additionally, proper temperature and humidity levels significantly influence the drying and adherence of the paint.
Apply Second Coat (If Necessary)
After the initial coat of paint has dried, it may be necessary to apply a second coat to achieve the desired durability and colour richness of the roof.
When assessing the need for a second coat, it is important to consider several factors, including the type of paint used, such as Acrylic Roof Tile Paint, the surface texture, and the overall coverage. It is crucial to confirm that the first coat has completely dried and cured, which can be assessed by examining its finish. A smooth and consistent appearance indicates that the painting process should proceed. Conversely, if any unevenness or patchiness is observed, a second application can rectify these issues, resulting in a uniform and professional appearance.
Applying a second coat not only enhances protection against environmental elements but also deepens the colour, ensuring a visually appealing final outcome. To apply it effectively, the following guidelines should be adhered to:
Ensure the first coat is dry by following the manufacturer's recommended drying times.
Lightly sand the surface to promote adhesion between coats.
Use a high-quality paint applicator, such as those from Nutech or Mirka, to achieve an even finish.
In conclusion, the advantages of multiple coats extend beyond aesthetics; they significantly contribute to enhanced durability, ensuring that the roof retains its integrity and attractive appearance for years to come.
Tips For Maintaining Your Painted Roof
Maintaining a newly painted roof is essential for preserving its aesthetic appeal and ensuring its longevity. This process requires regular inspections, cleaning, and touch-ups and reinforcements to keep the roof in optimal condition.
Regular Cleaning
Regular maintenance of your painted roof is crucial for the removal of debris, mould, and UV protection elements, and other elements that can negatively impact its appearance and protective properties.
To maintain the integrity of the painted surface, it is recommended to clean the roof at least twice a year, ideally in the spring and autumn. This frequency helps prevent the accumulation of organic material, which can lead to discolouration and degradation. During these cleaning sessions, it is advisable to employ gentle methods to safeguard both the paint and the roofing materials.
Some recommended practices include:
Utilising a soft bristle brush or a low-pressure hose to avoid damaging the paint.
Refraining from the use of abrasive cleaners that may scratch the surface or compromise the protective coating.
Employing eco-friendly cleaning solutions that are safe for the environment, thus minimising the risk of chemical damage to surrounding vegetation.
Additionally, it is important to adhere to safety practices, such as wearing appropriate footwear and utilising stable ladders, to ensure a secure cleaning process.
Inspect For Damage
Conducting regular inspections of your roof is essential for identifying any damage at an early stage, allowing for timely intervention before issues escalate into more significant problems.
Regular maintenance is crucial for ensuring the durability of any roofing system. By performing a thorough inspection, property owners can identify various potential issues, including:
Missing or damaged tiles: These deficiencies can allow water to penetrate, resulting in leaks and structural damage.
Cracks in the flashing: This critical component seals roof edges and joints; any compromise can direct water into vulnerable areas.
Accumulation of debris: Leaves and branches can trap moisture, resulting in the growth of moss or algae, which may erode the roofing material.
Flashing deterioration: Regular inspection of this component can prevent water from seeping into seams and joints.
Promptly addressing minor repairs not only safeguards the integrity of the roofing structure but also extends the lifespan of the roof and minimises the risk of incurring costly repairs in the future.
Touch Up Paint As Needed
Touching up paint in areas where it has chipped or faded is essential for maintaining both the appearance and protective qualities of the roof over time.
Ensuring that the roof remains visually appealing is not solely a matter of aesthetics; it is crucial for preserving its integrity and longevity. When considering the task of touching up paint, selecting the appropriate colour, especially when considering Colorbond options is vital to ensure a seamless match with the existing hue.
It is advisable to utilise paint samples or swatches to compare shades under different lighting conditions. The choice of paint type—whether acrylic, emulsion, or oil-based—significantly influences both adhesion and durability. It is important to note that touch-ups may be necessary not only due to physical wear but also as a result of seasonal changes that could lead to discolouration.
Inspect the roof regularly for signs of damage.
Consult with a professional if there are uncertainties regarding colour matching.
Document the types of paint used for future reference.
By adhering to these guidelines, one can ensure that the roof remains cohesive and visually appealing throughout its lifespan.
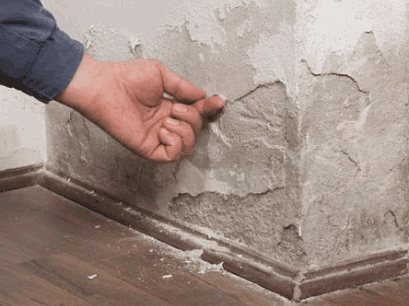
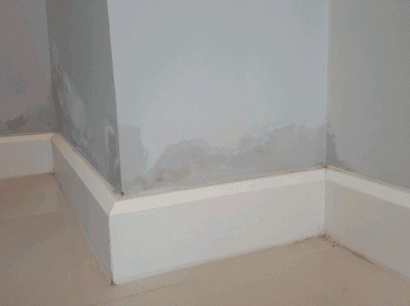
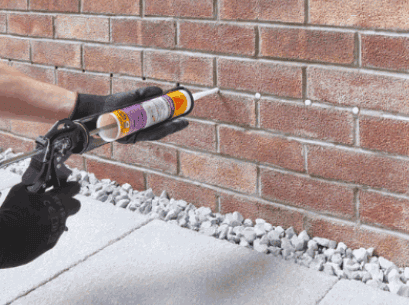
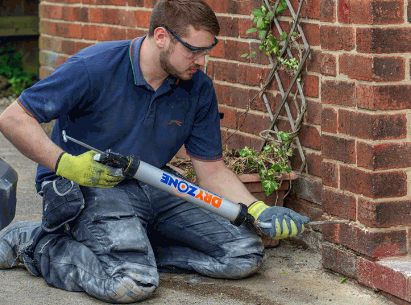
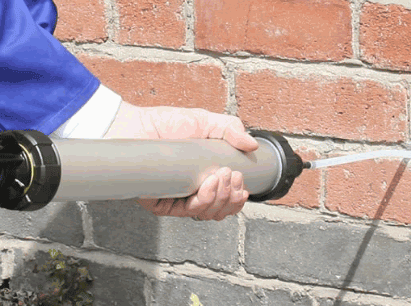
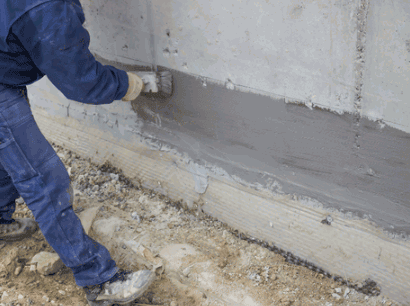
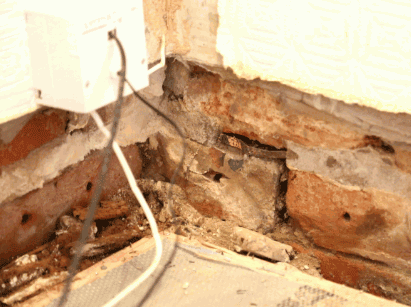
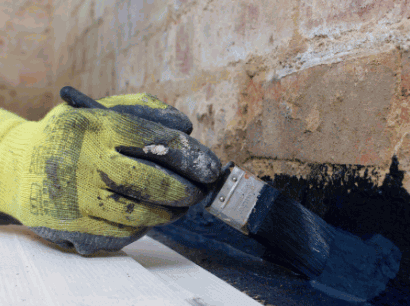
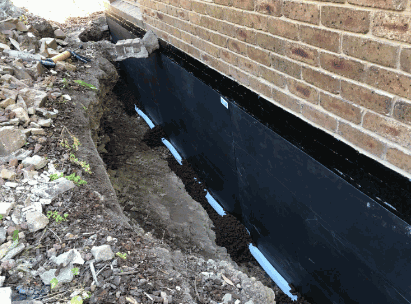
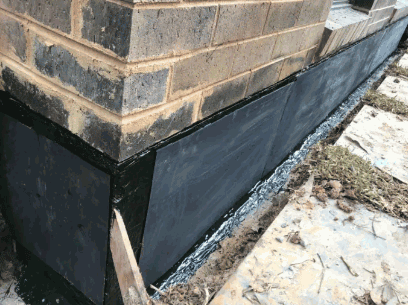
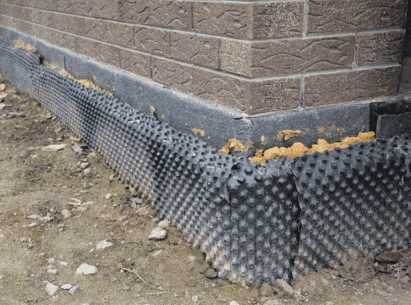
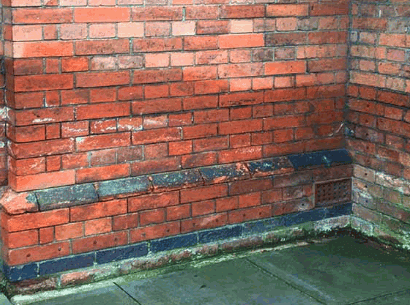
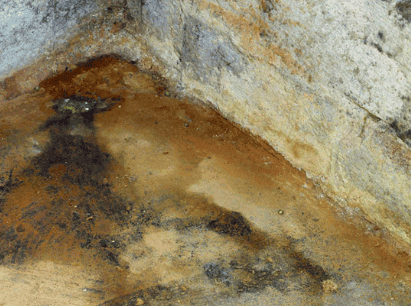
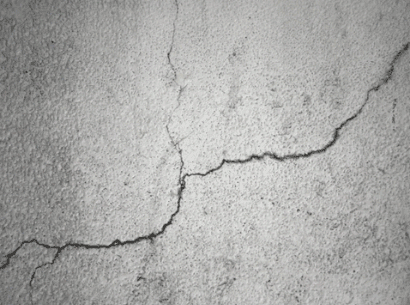
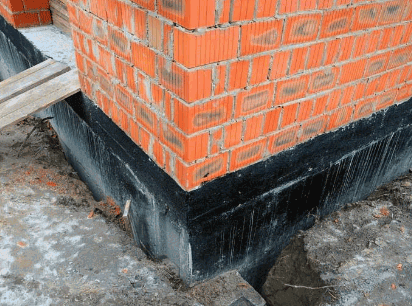
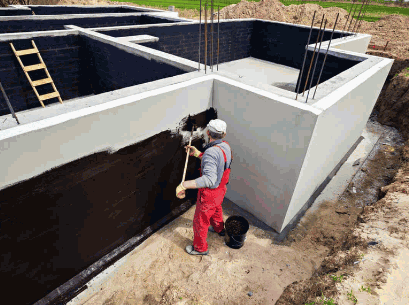
Damp proofing is a crucial step in maintaining the integrity of your home, ensuring your walls remain dry and free from moisture-related issues.
This guide explores what damp proofing entails, why it is essential, and the various causes of dampness in walls, from rising damp, rising damp, penetrating damp, and rising damp, penetrating damp, and condensation, and condensation to condensation.
Learn about the costs associated with damp proofing, factors that influence pricing, and whether to tackle the job yourself or hire a professional.
Discover tips for selecting the right damp proofing company to safeguard your home effectively.
What Is Damp Proofing?
Damp proofing is a critical process in essential aspect of building conservation that involves applying various techniques and materials to prevent moisture ingress and prevent structural damage and health issues, which can arise from damp problems, which can arise from damp problems into walls and structures. This process is essential to protect properties from damp problems, which can lead to structural damage and health issues such as rising damp, penetrating damp, and condensation, which can lead to structural damage and health issues.
Effective damp proofing ensures longevity for buildings whilst maintaining their structural integrity. Among the most common solutions are the installation of a damp proof course and a damp proof course and a damp proof membrane and a damp proof membrane, which act as creating a waterproof barrier to safeguard your homes against moisture.
Why Is Damp Proofing Important?
Damp proofing is paramount for maintaining a healthy living environment and protecting property value. Without effective damp proofing solutions, properties are susceptible to moisture ingress, which can lead to serious structural damage over time.
Uncontrolled dampness can create conducive conditions for mould and mildew, resulting in health issues for occupants. Therefore, investing in damp proofing not only preserves the integrity of the building but also enhances the comfort and safety of its inhabitants.
Dampness in walls can arise from several sources, each contributing to various damp problems that may affect a property. The most common causes include:
Rising damp, where moisture from the ground travels up through the walls;
Penerating damp, resulting from water ingress due to poor maintenance or weather conditions;
Condensation caused by inadequate ventilation and high humidity levels.
Understanding these causes is essential for homeowners and damp specialists and their expertise to implement effective damp proofing solutions and prevent further damage.
Rising Damp
Rising damp is a common issue characterised by moisture rising through the walls from the ground due to capillary action. This phenomenon often leads to significant structural damage and can compromise the integrity of a building if not addressed promptly. The presence of a damp proof course is crucial in preventing rising damp, as it acts as a barrier to moisture ingress, safeguarding the property from long-term damage and associated long-term repair costs associated with neglecting damp problems.
Understanding how rising damp affects buildings requires a closer look at the mechanics involved. Moisture present in the ground can find its way into building materials, travelling upwards through tiny pores and cracks in the masonry. As this moisture evaporates into the air, it leaves behind unsightly stains, peeling paint, and in some cases, mould growth. This can lead to a host of issues, not only damaging the aesthetics of the property but also degrading air quality and potentially affecting the health of occupants.
Consequences of rising damp include:
Structural damage to walls and foundations
Reduced property value
Increased energy costs due to poor insulation
To combat these effects, a damp proof course can be installed during construction or retrofitted in existing buildings. This barrier is typically made from materials like plastic or bitumen, effectively interrupting the pathway of moisture and keeping it away from vulnerable areas. Ensuring that this system is in place is essential for maintaining both the durability and value of any property.
Penetrating Damp
Penetrating damp occurs when water infiltrates through walls, often due to structural defects or external factors such as heavy rainfall. It can lead to unsightly stains, peeling paint, and further damage if left unchecked.
Understanding the root causes is crucial for homeowners and property managers alike. Common culprits include:
Cracked walls or gaps around windows
Blocked gutters and downpipes
Deficient roof structures or missing tiles
These issues not only degrade the aesthetic value of the property but also create an unhealthy living environment, potentially leading to mould growth. To combat this, a proactive approach is needed. Establishing a waterproof barrier through the use of French drains can also help manage moisture and effective drainage systems is essential in mitigating the risks associated with penetrating damp.
Proper maintenance and timely repairs can significantly reduce long-term repair costs.
Condensation
Condensation is a prevalent issue in properties, arising from the build-up of moisture in the air, particularly in inadequately ventilated spaces.
This phenomenon often occurs during colder months when warm, moist air comes into contact with cool surfaces, such as windows or walls, resulting in water droplets forming. If left unaddressed, condensation can lead to severe consequences, including mould growth, which poses risks not only to structural integrity but also to the health of anyone residing within the property.
To combat these issues, property owners can adopt various actionable solutions.
Ventilation methods: Installing extractor fans in kitchens and bathrooms can help to expel excess moisture.
By effectively managing airflow and moisture levels, homeowners can significantly reduce the chances of condensation and its related problems.
How Much Does Damp Proofing Cost?
The costs associated with damp proofing can vary greatly depending on the severity of the damp problems, the methods employed, and the size of the property. Generally, implementing a damp proof course or damp proof membrane involves initial investments that can save homeowners from expensive repairs later on.
Understanding the factors affecting repair costs is crucial for making informed decisions about damp proofing solutions.
Factors Affecting The Cost Of Damp Proofing
Various factors play a significant role in determining the cost of damp proofing, including the extent of the damp issue, the type of treatment required, and the involvement of damp specialists. Properties undergoing renovation may also incur additional costs due to the need for thorough assessments and potential structural repairs. Understanding these factors can help homeowners navigate the financial aspects of property maintenance effectively.
One key element to consider is the degree of dampness; minor issues may only need a simple solution, while severe cases could require a comprehensive barrier system, driving costs up significantly. Homeowners should also be mindful of the:
location: Properties in areas prone to flooding might necessitate more robust solutions.
type of property: Different building materials can affect treatment choices.
age of the property: Older structures may need extensive repair work prior to treatment.
Seeking estimates from multiple damp specialists can provide clarity on the options available and help find a cost-effective solution.
Average Costs For Different Damp Proofing Methods
Average costs for damp proofing methods vary widely, with techniques like installing a damp proof course or damp proof membrane generally costing between £1,000 and £3,000 depending on the size and condition of the property. More advanced methods, such as black jacking and electro-osmosis or electro-osmosis, can lead to higher repair costs due to their complexity. Homeowners should seek multiple quotes to compare and understand the potential expenses involved.
Plus standard damp proofing solutions, there are several alternative methods available.
Surface treatments such as liquid damp proofing can be cost-effective, generally ranging from £500 to £1,500, depending on the area covered.
For severe cases, internal tanking systems might be required, costing upwards of £2,000.
The type of property, its age, and local market rates also greatly influence pricing.
Conducting thorough research and considering long-term efficacy versus initial outlay can help guide homeowners towards the most suitable damp proofing options tailored to their specific needs.
DIY Vs Hiring A Professional For Damp Proofing
In terms of damp proofing, homeowners often face a critical decision between tackling the project themselves through DIY methods or hiring a professional damp specialist.
While DIY approaches may save on immediate repair costs, they often lack the expertise needed to address complex damp problems effectively. On the other hand, professionals bring specialised knowledge and experience, ensuring long-term solutions that contribute to property value.
Pros And Cons Of DIY Damp Proofing
DIY damp proofing can be an appealing option for homeowners looking to save on repair costs, but it comes with both advantages and disadvantages.
This approach allows individuals to take control of their home environment and potentially achieve significant savings on professional services. It's essential that homeowners understand the complexities of damp proofing. Without proper knowledge, one might choose inadequate solutions, resulting in more extensive damage over time.
For instance, while options like waterproof plaster or anti-mould paint can be effective on the surface, they often fail to address the root causes of dampness, such as poor drainage or ventilation.
Below are considerations to keep in mind:
Ensure proper surface preparation to enhance adhesion.
Conduct a thorough inspection to identify the underlying moisture source.
Consider professional guidance for complicated issues.
Ultimately, a balanced understanding of both the benefits and drawbacks is crucial for making informed decisions regarding DIY damp proofing.
Benefits Of Hiring A Professional For Damp Proofing
Hiring a professional for damp proofing brings numerous benefits that can outweigh the costs associated with their services. Damp specialists possess the expertise to accurately diagnose damp problems and implement tailored solutions that ensure the longevity of the property. Their professional experience in property renovation can save homeowners from future repair costs and ensure a robust and effective damp proofing strategy.
Plus their specialised knowledge, these experts offer warranties on their work, providing peace of mind that safeguards the homeowner's investment. Here are some key reasons why engaging with professionals is crucial:
Expert Knowledge: Professionals stay updated with the latest techniques and materials, ensuring the most effective solutions.
Thorough Assessment: They can identify underlying issues that may not be visible to the untrained eye, preventing recurrence of damp problems.
Time Efficiency: Their expertise allows for quicker diagnosis and resolution, minimising disruption to daily life.
Customised Solutions: Each property is unique, requiring a tailored approach to damp proofing that professionals are qualified to deliver.
Hiring a damp proofing professional is not just about addressing current issues; it’s about investing in the future health of the property.
How To Choose The Right Damp Proofing Company?
Choosing the right damp proofing company is crucial for ensuring that your property receives the best possible treatment for damp issues. Homeowners should look for damp specialists with appropriate certifications, a solid reputation, and positive reviews from previous clients.
Gathering multiple quotes and comparing services can help in making an informed decision, ultimately protecting the value and integrity of the property.
Check For Certifications And Experience
When selecting a damp proofing company, checking for certifications and experience is essential to ensure quality service. Certified damp specialists are more likely to be knowledgeable about the latest techniques and products, significantly reducing the chances of ineffective treatments. Their experience in the field also allows them to identify underlying damp problems that may not be apparent to an untrained eye.
Ensuring quality service involves not just looking at qualifications, but understanding what these certifications signify. For instance, certifications from organisations like the Property Care Association (PCA) or British Damp Proofing Association (BDPA) are indicators of a company’s commitment to adhering to industry standards.
Their team members must regularly engage in training and continuing education, maintaining proficiency in best practices. These certifications often require companies to follow strict codes of conduct, ensuring reliable workmanship that homeowners can trust.
Experience is equally important; a company that has handled diverse damp issues can offer tailored solutions. To illustrate this, you might find specialised experience in waterproofing buildings in flood-prone areas or remedial courses on tackling rising damp.
Thus, proactive homeowners should consider both features when choosing a damp proofing contractor.
Read Reviews And Ask For Recommendations
Reading reviews and asking for recommendations from trusted sources can greatly assist homeowners in selecting a reliable damp proofing company. Online platforms such as Checkatrade provide valuable insights into the experiences of previous clients, while recommendations from friends or family can lead to trustworthy specialists. This research ensures that the chosen company has a solid reputation for effectively treating damp problems.
Utilising these resources not only helps to unveil the credibility of potential providers but also allows for a comprehensive understanding of their service quality. Homeowners should consider the following avenues when evaluating options:
Online Reviews: Examine both the number of reviews and the overall ratings to gauge consistent performance.
Second Opinion: Gathering opinions from acquaintances or family members who have previously dealt with similar issues can often reveal hidden gems.
Transparency: A reputable company will be open about their procedures and past projects, providing ample proof of their effectiveness.
In a field where trust and integrity are paramount, exploring these different channels can lead to informed decisions and peace of mind.
Get Multiple Quotes And Compare
Obtaining multiple quotes is an essential step in choosing the right damp proofing company, as it allows homeowners to compare services, costs, and approaches to damp issues. Different damp specialists may offer varying solutions, and understanding these options can help in making a more informed decision regarding repair costs and effectiveness.
When embarking on this journey, it’s crucial to look closely at what each service entails. Reviewing each quote should not just focus on the price but also on the specifics included in the scope of work.
Assessment Process: How does the company plan to evaluate your property's damp issues?
Materials Used: Are they using high-quality materials that are proven to be effective?
Warranty Period: What kind of guarantees are offered for the work carried out?
In addition, be sure to inquire about timelines and customer support after the job is completed. This holistic view helps in assessing the overall value for money, ensuring that the chosen solution not only fits the budget but also meets the homeowner’s expectations for quality and durability.
Conclusion: The Importance Of Proper Damp Proofing For Your Walls
Proper damp proofing is essential for safeguarding your property against damp problems that can lead to costly structural damage and health issues.
Without proactive measures, moisture can seep into walls and foundations, jeopardising the safety and comfort of your dwelling. Homeowners must recognise that dampness often arises from various sources, including poor drainage and rising damp, thereby necessitating a comprehensive approach to tackle these challenges.
By understanding the causes of dampness and investing in effective damp proofing solutions, residents can significantly protect their investments and ensure a safe and comfortable living environment.
Regular maintenance and inspections will also play a crucial role in preserving the integrity of walls and ensuring the long-term viability of the property. It is advisable to periodically check for signs of moisture, such as peeling paint or mould growth, which may indicate underlying issues that require immediate attention.
Investing in high-quality materials can prevent future damp problems.
Engaging professional services for initial assessment ensures thorough understanding.
Routine checks help in early identification and remediation of potential risks.
Dampness can wreak havoc on properties, leading to structural damage and unhealthy living conditions, including issues like mould growth and moisture penetration.
One effective solution is chemical injection damp proofing, a method that prevents moisture intrusion and preserves the integrity of your home, and is often referred to as damp proofing.
This article explores how this technique works, from identifying affected areas through damp diagnosis to the final sealing process with a waterproof barrier.
You will discover the benefits it offers, common chemicals used, and alternatives available, ensuring you are well-informed to tackle damp issues effectively, such as those posed by rising damp.
What Is Chemical Injection Damp Proofing?
Chemical injection damp proofing is an advanced technique designed to protect properties from rising damp, which can cause severe structural damage if left untreated. This method involves the application of a waterproof barrier into the masonry walls of a building, effectively sealing it against moisture penetration and salt contamination that often leads to damp walls and mould growth, which can also affect the health benefits of living environments.
By creating a chemical damp proof course, homeowners can ensure long-term property protection against issues like rising damp and damp walls, and avoid costly repair expenses associated with damp related issues.
The process of chemical injection damp proofing involves several systematic steps to ensure effective moisture protection for brickwork walls and involves expert installation for best results. Initially, a thorough inspection is conducted to identify the affected area, followed by the preparation of the space for the application of the chemical solution.
This method utilises high-pressure injections to create a waterproof barrier that prevents moisture penetration and rising damp from causing further damage to the property.
Identification Of The Affected Area
The first step in chemical injection damp proofing is the identification of the affected area, which often includes damp walls that show signs of rising damp. A thorough damp diagnosis is crucial to pinpoint the extent of moisture penetration and locate areas where structural damage may have occurred, particularly in the context of rising damp and its effects.
Understanding the nuances of this process cannot be overstated, as accurate diagnosis plays a pivotal role in effectively combating the problem. Rising damp can manifest through various indicators, such as:
Water saturation on walls
Noticeable mould growth
Salts or efflorescence appearing on surfaces
Each of these signs can serve as a telling clue, highlighting the need for professional intervention. An inspection of the brickwork is essential; it reveals any hidden vulnerabilities that moisture may exploit and ensures that the chosen damp proofing method addresses all aspects of the issue comprehensively. By taking these steps, homeowners can protect their property and maintain a healthy environment.
Preparation Of The Area
Preparation of the affected area is essential for effective chemical injection damp proofing, often requiring the removal of plaster and skirting boards to expose the damp walls fully.
This initial step is critical as it not only allows for a thorough inspection of the dampness but also uncovers any underlying structural damage that may have gone unnoticed. Once the old plaster is removed, it is advisable to examine the skirting boards for any signs of rot or decay, which can further exacerbate the damp problem.
A clean workspace is paramount; therefore, ensuring that all debris is cleared away will facilitate a seamless chemical injection process, minimising risks of further damp penetration. By establishing a pristine area, the chemical solution can penetrate effectively, providing lasting moisture protection and preventing future issues.
Remove any old plaster carefully.
Inspect skirting boards for damage.
Ensure cleanliness for effective application.
Drilling Holes In The Affected Area
In this step, technicians drill holes into the masonry walls at specific intervals to allow for the injection of the chemical solution, a process known as damp injection. These holes facilitate the use of a specialised cartridge during the chemical injection process, ensuring even distribution throughout the affected area and providing a robust waterproof barrier.
This meticulous process involves precise measurements and careful planning to guarantee that the holes are placed optimally, targeting the areas most affected by dampness. Proper hole placement is critical because it influences how effectively the chemical solution permeates the wall. When executed correctly, this step maximises the benefits of chemical damp proofing, leading to remarkable results.
Drilling Techniques: Experts utilise various techniques, such as rotary drilling, ensuring efficient penetration without damaging the surrounding masonry.
Importance of Spacing: Depending on the wall's size and condition, the intervals between holes can vary, which enhances the solution's reach.
Preparation for Treatment: By preparing the wall accurately, technicians lay the groundwork for a successful chemical treatment that prevents moisture ingress and mitigates risks associated with rising damp.
The precision of hole placement is fundamental for achieving a durable and effective damp proof barrier.
Injection Of The Chemical Solution
Once the holes are drilled, the next step involves the injection of a specially formulated chemical solution using high-pressure injections that create a waterproof barrier against future moisture penetration. This chemical injection effectively blocks rising damp and mitigates the risk of structural damage within the property.
The chemical solutions used in this process typically include silicates, urethanes, and various polymers, which are designed to penetrate deep into the masonry and create a robust barrier.
These solutions are engineered to be injected at high pressure, ensuring they reach the most challenging spots, effectively sealing off pathways for moisture. Silicone plays a crucial role in enhancing these barriers, as it possesses water-repellent properties that offer long-lasting protection.
The effectiveness of the silicone allows the barrier to withstand considerable water pressure.
High-pressure injections ensure that the chemicals bond with the substrate, preventing future moisture issues.
Using a combination of these chemical solutions boosts the overall durability of the waterproofing efforts, ensuring a reliable damp proof course.
Sealing Of The Holes
After the chemical solution is injected, sealing the holes is a crucial step in the chemical injection damp proofing process. This sealing not only protects the integrity of the injected chemical solution but also reinforces the damp proof course, enhancing overall property protection against rising damp and moisture.
This process typically involves using high-quality sealants or fillers that bond effectively with the surrounding materials. By properly sealing these openings, the properties of the chemical treatment are preserved, ensuring that it works efficiently over time.
This step is integrally linked to broader damp proofing strategies, which encompass moisture barriers and drainage systems that work together to prevent water ingress and promote effective ventilation. By paying attention to this aspect, homeowners can extend the lifespan of their damp proofing solutions while minimising future repair costs and issues.
Choosing the right materials is vital for optimal performance.
Regular maintenance checks will help sustain the system's effectiveness.
Integrating this method with other protective measures is paramount for comprehensive damp management.
Thus, the sealing process plays a fundamental role in solidifying the property’s defence against moisture.
Drying And Re-plastering
The final step involves allowing sufficient time for drying before re-plastering the treated area. This ensures that the moisture protection provided by the chemical injection is fully effective and that any plaster removal is followed by a reliable restoration process.
Ensuring the correct drying time is critical as it directly impacts the adhesion quality of new plaster and the overall durability of the damp proofing solution.
During this phase, it is advisable to monitor the moisture levels within the walls to guarantee they fall within acceptable limits. You can consider the following methods for effective re-plastering:
Utilising breathable plaster that allows moisture to escape
Applying multiple thin layers for better settlement
Using additives to enhance drying times
Ultimately, by paying careful attention to the drying process, homeowners can significantly increase the longevity of their damp proofing efforts, thus reducing repair costs and maintaining a healthy indoor environment.
What Are The Benefits Of Chemical Injection Damp Proofing?
Chemical injection damp proofing offers several benefits, including long-lasting protection against rising damp, which can significantly reduce repair costs associated with structural damage.
This method is a cost-effective solution that minimises disruption to the property and ensures an effective waterproof barrier for years to come, thus offering significant health benefits.
Long-lasting Protection
One of the primary benefits of chemical injection damp proofing is its long-lasting protection, which effectively prevents rising damp and maintains the integrity of the damp proof course, thereby safeguarding your property from structural damage and related issues like mould growth.
This technique is not merely a temporary fix; it establishes a robust chemical barrier that effectively halts moisture penetration from the ground. Chemical injections are skilfully administered into the walls to create a waterproof membrane that is highly effective in repelling future damp related issues.
Over time, this barrier significantly reduces moisture levels, ensuring a dry and healthy environment within your property.
Reduces the risk of mould growth, which can pose health risks.
Prevents damage to internal finishes, preserving aesthetic appeal.
Contributes to the overall longevity of your property.
Includes brickwork inspection to assess any potential issues.
By choosing this method, property owners can rest assured that they are investing in a durable solution that promises sustained performance for years to come, particularly effective against rising damp.
Cost-effective Solution
Damp proof injection is a cost-effective solution compared to other damp proofing methods, as it can significantly reduce repair costs associated with ongoing moisture issues when carried out by professionals during the expert installation process.
This innovative approach not only addresses damp problems at their source but also provides lasting protection, thereby minimising the potential for future damage. By investing in this technique, property owners can avoid the escalating expenses typically linked to severe moisture-related issues such as mould growth and structural deterioration, often caused by capillary action.
With early intervention, the overall maintenance costs decrease, making it a wise financial choice.
Addressing damp issues promptly translates into a healthier living environment, preventing health-related costs associated with prolonged exposure to damp conditions.
Therefore, effective damp proofing methods like this one are crucial for safeguarding not only structures but also financial investments in the long term.
Minimal Disruption To The Property
Another advantage of chemical injection damp proofing is that it causes minimal disruption to the property, allowing homeowners to continue their daily lives while the chemical injection process is performed efficiently.
Unlike traditional methods, which often involve extensive excavation and structural alterations, this technique operates quickly and cleanly. Homeowners can expect effective property protection without the chaos typically associated with more conventional approaches. The efficiency of the chemical solution not only reduces downtime but also ensures a faster return to normal operations within the home.
The application involves less mess and noise, making it ideal for residences still occupied during the process. This method provides peace of mind as it effectively creates a barrier against moisture, safeguarding the integrity of walls and foundations.
Minimal mess compared to traditional damp proofing
Quick application allows for immediate resumption of normal activities
Long-lasting protection against rising damp, making it a preferred method for many.
Versatile Application
Chemical injection damp proofing is known for its versatile application, making it suitable for various structures such as brickwork, masonry walls, and even older buildings that may suffer from rising damp and moisture issues. This adaptability makes it ideal for both residential and commercial properties.
The adaptability of this technique is especially noteworthy, as it can be implemented effectively in both residential and commercial properties. Whether it’s a quaint historical home or a modern office building, chemical injection damp proofing provides a reliable solution to combat moisture intrusion. Many property owners find this method appealing due to its minimal disruption, allowing occupants to continue their daily activities without significant interference.
Effectiveness across different climates
Suitable for a variety of substrates
Long-lasting results with proper application
By targeting the roots of dampness and providing a waterproof barrier, property managers can maximise the longevity and structural integrity of their investments, ultimately contributing to a safer, more durable construction environment.
What Are The Common Chemicals Used In Injection Damp Proofing?
In the process of injection damp proofing, several common chemicals are used to ensure effective moisture protection and prevention of rising damp, which is crucial for maintaining property value.
Silane and polysiloxane solutions
Polyurethane resins
Silicate solutions
Each offering unique benefits for various applications.
Silane/Siloxane Solutions
Silane and siloxane solutions are commonly used in injection damp proofing due to their ability to penetrate masonry walls and create a robust waterproof barrier that effectively prevents moisture penetration.
These solutions offer various advantages that make them a preferred choice among builders and property owners. For instance, the long-lasting effects of silane and siloxane treatments ensure that once applied, the waterproof barrier remains effective for many years, significantly reducing maintenance costs. They are particularly effective against rising damp, which can otherwise lead to structural damage and mould growth.
Ease of Application: They can be easily injected into existing walls without extensive renovations.
Non-toxic: Compared to traditional methods, these solutions are safer for both users and the environment.
Versatility: They can be used on various masonry surfaces, enhancing their applicability in different construction scenarios.
Thus, the practical benefits of these silane and siloxane solutions make them a reliable choice for anyone looking to protect their property from unwanted moisture.
Polysiloxanes
Polysiloxanes are another effective chemical option for injection damp proofing, offering excellent moisture protection while forming a durable waterproof barrier within the masonry structure.
These innovative compounds have gained popularity due to their remarkable ability to penetrate deep into the substrates, thus ensuring long-lasting performance. By utilising polysiloxanes, property owners can benefit from reduced humidity levels, enhancing the overall comfort and longevity of both residential and commercial buildings. The application methods are relatively straightforward, involving straightforward injection techniques that can be executed by professionals or experienced DIY enthusiasts.
Proven effectiveness in creating a hydrophobic layer
Resistance to various environmental conditions
Compatibility with different masonry types
Such versatility not only addresses the rising damp issue efficiently but also preserves the aesthetic appeal of structures, making polysiloxanes a favoured choice in modern construction and restoration efforts.
Polyurethane Resins
Polyurethane resins are known for their versatility and strength, making them a popular choice for injection damp proofing as they provide an effective waterproof barrier against moisture intrusion.
These resins exhibit remarkable flexibility and durability, which allow them to adapt to various environmental conditions without compromising performance. This characteristic makes them particularly useful in applications such as:
Protective coatings for structures in high-moisture areas
Sealants that prevent water penetration in basements
Applications where adherence to surfaces is critical for long-term effectiveness
Their ability to maintain structural integrity against rising damp is crucial for preserving the lifespan of buildings.
The chemical resistance of polyurethane resins further ensures they withstand degradation from harsh conditions, facilitating ease of maintenance. These properties contribute significantly to a safer, more durable construction environment, highlighting their value in modern building practices.
Silicate Solutions
Silicate solutions are also utilised in injection damp proofing, known for their capability to penetrate deeply into masonry, forming a waterproof barrier that effectively counteracts rising damp.
These solutions stand out due to their unique chemical composition, which allows them to not only provide immediate protection but also create a robust long-lasting defence. For instance, when applied to walls, they initiate a series of chemical reactions that bond with silica in the masonry, enhancing strength and durability. This process effectively seals microscopic pores, preventing moisture ingress and contributing greatly to the overall damp proofing completed successfully.
High penetration ability serves to reach difficult-to-access areas.
They are suitable for various masonry types, making them versatile in application.
By reducing water absorption, they alleviate structural stress from damp related issues.
Ultimately, using silicate solutions offers not just a solution to damp related concerns but also promotes the longevity of the structure.
How Effective Is Chemical Injection Damp Proofing?
Chemical injection damp proofing is highly regarded for its effectiveness in preventing rising damp and providing moisture protection within various property types. The durability of the waterproof barrier created through this method significantly reduces the risk of structural damage over time.
Numerous studies have highlighted the substantial advantages of employing this technique, showcasing its applicability in residential, commercial, and historical buildings alike. For instance, a recent case study conducted on a Victorian-era property demonstrated that after implementing chemical injection damp proofing, moisture levels dropped by an impressive 75% within just a few weeks.
Testimonials from satisfied customers also reinforce these findings, as many report experiencing noticeable improvements in indoor air quality and overall property value.
In one case, a property owner noted a significant decline in damp related health complaints.
Another highlight was the successful restoration of a once-historically significant warehouse converted into modern offices.
As research continues to validate these results, chemical injection damp proofing remains a top choice for property owners aiming to safeguard their investments.
What Are The Alternatives To Chemical Injection Damp Proofing?
While chemical injection damp proofing is a popular method for tackling rising damp, there are several alternatives available that can also provide effective moisture protection. These include:
Physical damp proofing methods
Electro-osmotic damp proofing
Surface damp proofing techniques
Each with its unique advantages and applications.
Physical Damp Proofing
In essence, physical damp proofing techniques serve as a critical line of defence against moisture infiltration, especially crucial in areas prone to high humidity or heavy rainfall. These systems work by implementing a variety of methods to inhibit water penetration, which can lead to structural damage and health risks due to mould growth. One of the most popular methods is the installation of a damp proof membrane (DPM), typically made from polyethylene, which acts as a moisture barrier between the ground and the building.
Another effective technique includes the use of damp proof courses (DPC) that are incorporated into masonry walls, typically made from materials like slate or bitumen.
In some conditions, applying injectable damp proofing chemicals into the wall may be effective in treating existing damp issues.
Understanding the specific environmental factors is essential as different solutions might perform better in various conditions, which underscores the importance of assessing the site before implementation. With the right approach, physical damp proofing can significantly enhance building longevity and indoor air quality.
Electro-osmotic Damp Proofing
Electro-osmotic damp proofing is a method that uses electrical currents to control the movement of moisture within masonry walls, effectively preventing rising damp.
This innovative technique operates by applying a low-voltage current through specially placed electrodes in the walls, creating an electric field that alters the natural movement of water molecules. Consequently, moisture is guided away from vulnerable areas, significantly reducing damp related issues.
The advantages of this system are manifold. It not only stops rising damp but also protects against mould growth and enhances overall indoor air quality. It can be a less invasive solution compared to traditional methods, such as chemical damp proofing or excavation.
Electro-osmotic damp proofing is particularly effective in properties with historical significance or where conventional damp proofing options may cause structural damage. This makes it an ideal choice for home restorations, basements, and buildings situated in areas with high groundwater levels.
Surface Damp Proofing
Surface damp proofing techniques involve applying coatings or membranes to external walls to create a waterproof barrier, preventing moisture from entering the structure while ensuring the longevity and integrity of the building materials used in its construction.
These methods can vary significantly in their application, effectiveness, and suitability depending on the conditions present.
Liquid Damp Proofing: This method utilises liquid coatings that can be painted on surfaces, providing a seamless protective layer ideal for both new and old buildings.
Membrane Systems: These involve installing a physical barrier, such as polyethylene sheeting, which is especially effective in environments where constant water exposure is present.
Crystalline Waterproofing: This technique employs a chemical process that reacts with water to form a waterproof crystalline structure within the concrete.
Each method proves effective in varying scenarios; for example, liquid damp proofing is often recommended for areas without significant water pressure, while membrane systems excel in basements or regions with high groundwater levels.
Ultimately, the choice of a surface damp proofing method should be based on a thorough assessment of environmental conditions and specific project needs.
Damp proofing is a crucial process that protects your home’s external walls from moisture-related issues.
This guide explores the importance of damp proofing, signs of damp, and effective methods to safeguard your property.
Whether you notice visible stains, a musty odour, or peeling paint, it’s important to address these issues promptly.
Also discussed are the significant benefits of damp proofing, including improved indoor air quality and increased property value.
Read on to ensure your home remains safe and sound.
What Is Damp Proofing?
Damp proofing is a critical method used in construction to prevent moisture intrusion, ensuring that both internal and external walls maintain their structural integrity and remain free from issues like rising damp and penetrating damp.
This process often involves applying specialised materials such as damp proof courses or cream to effectively block the entry of water, preventing potential damage to masonry and plaster, and reducing the risk of mould growth and condensation in buildings.
Why Is Damp Proofing Important For External Walls?
Damp proofing is essential for external walls as it serves as a protective barrier against water ingress, which can lead to structural damage and long-term issues such as mould growth and deterioration of the masonry. Without proper damp proofing measures, walls may suffer from moisture-related problems that compromise the integrity of the building and pose health risks for its occupants.
What Are The Signs Of Damp In External Walls?
Identifying the signs of damp in external walls is crucial for addressing potential issues before they escalate into serious damage.
Common indicators include:
visible stains or discolouration on the walls,
the presence of black mould,
peeling or blistering paint, and
noticeable cracks in the masonry,
each of which signals the intrusion of moisture and requires timely intervention.
Visible Stains Or Discolouration
Visible stains or discolouration on external walls are often one of the first signs of dampness, indicating moisture infiltration that can lead to more severe issues over time.
This infiltration can stem from multiple sources, including leaky roofs, blocked gutters, or even rising ground moisture. It’s important to recognise the various types of moisture that may contribute to these stains.
For instance,
Rainwater can seep through cracks in masonry
Condensation can build up on cooler surfaces
Groundwater can rise, resulting in persistent dampness
Each of these factors can lead to not only cosmetic damage but also structural concerns if left unaddressed. To treat and prevent such issues, homeowners should consider strategies such as enhancing drainage systems, applying waterproof paints, and ensuring proper ventilation.
Regular inspections can also help keep an eye out for the initial signs. By implementing proactive solutions, it’s possible to safeguard the integrity of the property and maintain its visual appeal.
Musty Odour
A musty smell often accompanies dampness and can be a strong indicator of hidden moisture issues within external walls, often linked to the growth of mould.
The presence of such smells not only diminishes indoor air quality but also affects overall comfort, making living spaces feel unwelcoming. This is particularly problematic in homes where family members may suffer from allergies or respiratory issues, as musty odours are often associated with unhealthy airborne pollutants and microbial growth. Ignoring these signs can lead to more severe issues like structural damage or health complications over time.
To effectively tackle the problem, it’s essential to:
Identify and eliminate the source of moisture.
Ensure adequate ventilation in areas prone to dampness, such as basements or kitchens.
Utilise dehumidifiers to maintain optimal humidity levels, ideally between 30-50%.
Regularly inspect roof and plumbing systems for leaks or wear.
Implementing these remediation and prevention methods can significantly improve indoor air quality and create a more pleasant environment overall.
Peeling Or Blistering Paint
Peeling or blistering paint on external walls is a clear sign of dampness, indicating that moisture is affecting the integrity of the paint and potentially the underlying surface.
This deterioration often occurs due to several factors, particularly moisture infiltration, which can arise from a variety of sources such as rainfall, plumbing leaks, or even poor drainage systems. When water seeps beneath the paint layer, it can lead to the formation of blisters, bubbles, or strips of flaking paint, compromising not just the cosmetic appearance but also the protective qualities of your walls.
Inadequate ventilation.
Low-quality paint.
Temperature fluctuations.
To combat these issues effectively, consider using waterproofing techniques, repairing any leaks promptly, and choosing high-quality, moisture-resistant paint for future applications. Implementing a proper sealing method and ensuring thorough surface preparation can also make a significant difference in prolonging the lifespan of your paint job.
Cracks In The Walls
Cracks in external walls can be a troubling indication of dampness and structural issues, as they often provide pathways for moisture to enter the building. Recognising the different types of cracks is crucial for homeowners seeking to ensure the integrity of their property.
In many cases, these cracks can manifest in several forms, including vertical, horizontal, or even diagonal shapes.
Vertical cracks typically indicate settling issues.
Horizontal cracks may suggest that the structure is experiencing pressure from outside forces, such as soil or water.
Diagonal cracks, on the other hand, can be caused by a combination of both settling and stress.
Each of these conditions can lead to significant implications for structural stability, potentially compromising load-bearing walls or leading to moisture intrusion.
Timely repairs are essential as well as implementing effective waterproofing solutions, such as sealing or installing drainage systems, to protect against further damage.
How To Damp Proof External Walls?
Damp proofing external walls requires a systematic approach that begins with identifying the source of dampness and implementing effective waterproofing solutions to protect the structure.
This multi-step process includes:
Repairing any structural issues
Applying a damp proof coating
Improving ventilation
Potentially installing a damp proof membrane to ensure long-term protection against moisture.
Identify The Source Of Dampness
Identifying the source of dampness is the crucial first step in effectively damp proofing external walls, as it allows homeowners to target the underlying issues causing moisture infiltration.
Understanding the various forms of dampness is essential for effective remediation. Common sources include rising damp, where moisture from the ground ascends through porous materials, leading to unsightly salt deposits on walls. Another prevalent issue is penetrating damp, often resulting from leaks or compromised masonry that allows water to seep in during heavy rainfall or through faulty roofing. Water ingress can occur due to external factors like poor drainage or inadequate guttering.
Assess the property’s foundation for cracks and deterioration.
Examine roof integrity to prevent leaks.
Check gutter systems and downpipes for blockages.
By conducting thorough assessments, homeowners can pinpoint the specific origins and address them effectively.
Repair Any Structural Issues
Repairing any structural issues in external walls is essential for effective damp proofing, as compromised structures can allow moisture to penetrate and cause significant damage over time.
Structural issues can manifest in various forms, including cracks, poor drainage, and subsidence. Each of these problems not only threatens the integrity of the building but also contributes to an increased risk of damp.
For instance,
Cracked walls can create openings through which water enters, exacerbating moisture problems.
Poor drainage systems may cause water to pool around the foundation, leading to rising damp.
Subsidence can shift walls out of alignment, further instigating cracks and water ingress.
To tackle these challenges effectively, it’s crucial to conduct a thorough assessment of the property. Solutions may vary; for instance, installing proper drainage systems or applying waterproof coatings can prove beneficial.
In more severe cases, underpinning may be required to stabilise a settling foundation. Addressing these structural issues promptly not only enhances the overall durability of the building but also significantly mitigates the risks associated with damp, leading to a healthier living environment and ensuring that exterior walls are properly treated.
Apply A Damp Proof Coating
Applying a damp proof coating to external walls is a vital step in the waterproofing process, providing an additional protective layer against moisture infiltration.
This type of coating acts as a barrier, preventing water from penetrating the structure, thereby protecting the integrity of the building.
There are several types of damp proof coatings available today, including:
Bituminous coatings - these are widely used due to their waterproof properties and flexibility, providing a strong barrier against freeze-thaw cycles.
Polyurethane coatings - known for their durability and resistance to chemicals, making them ideal for industrial applications, including Damp Proofing Cream.
Silicone-based coatings - these provide excellent water repellence while also allowing for breathability, perfect for brickwork and masonry.
The application methods vary depending on the type of coating, with options ranging from brush or roller application to spraying, ensuring ease of use and versatility, and enabling a breathable finish.
Implementing a proper damp proofing system not only enhances the longevity of the structure but also creates a healthier living environment by minimising the risk of mould and other moisture-related issues, particularly in internal walls.
Improve Ventilation
Improving ventilation in areas around external walls is a crucial step in damp proofing, as sufficient airflow helps to reduce moisture levels and prevent damp related issues.
Ensuring that air circulates freely within a building is essential for maintaining a healthy environment. When airflow is limited, dampness can accumulate, leading to potential problems such as mould and structural damage.
To enhance airflow, consider implementing the following strategies for effective cleaning and maintenance:
Install vents in key areas, especially in rooms prone to moisture such as bathrooms and kitchens.
Utilise extractor fans that can efficiently remove humid air.
Keep windows open during dry periods to promote natural ventilation.
Regularly check and clean air pathways to prevent obstructions.
By prioritising these methods, one can significantly improve ventilation, thus safeguarding against the risks associated with dampness, and ensuring the treatment of any existing issues.
Install A Damp Proof Membrane
Installing a damp proof membrane can provide an effective barrier against moisture intrusion, serving as a critical component in the damp proofing of external walls, especially in areas prone to high humidity or water exposure, ensuring that the structural integrity of the building is maintained for years to come.
The installation process for these membranes typically involves several key steps:
Site Assessment: Evaluate the property's vulnerability to moisture.
Surface Preparation: Ensure that the walls are clean and free from debris or loose material.
Membrane Selection: Choose from various types, including polyethylene, bituminous, and liquid-applied membranes, each offering unique benefits based on the specific needs of the structure.
Application: Properly align and securely fasten the membrane to create a continuous barrier.
Sealing Joints: Use tape or adhesive to seal overlapping edges, preventing water seepage.
Such measures contribute significantly to the overall effectiveness of waterproofing, safeguarding against deterioration, mould growth, and efflorescence.
What Are The Benefits Of Damp Proofing External Walls?
Damp proofing external walls offers a multitude of benefits that extend beyond mere protection from moisture; it safeguards the structural integrity of buildings, enhances energy efficiency, and ultimately increases property value.
By preventing damp related issues, homeowners can ensure a healthier living environment and reduce potential repair costs in the long term.
Prevents Damage To The Building
One of the primary benefits of damp proofing external walls is its ability to prevent damage to the building caused by moisture infiltration, ensuring that the structural integrity remains intact over time and reduces the need for costly repairs.
Damp proofing plays a crucial role in safeguarding a structure against various forms of damage, ensuring a safe and healthy environment. Here are some ways it achieves this:
Prevention of Mould Growth: By effectively blocking moisture, it helps minimise conditions that foster mould growth, thus promoting better indoor air quality.
Preservation of Masonry: Moisture can lead to the deterioration of masonry, causing unsightly cracks and deterioration; damp proofing prolongs the life of these materials.
Reduction of Structural Weakness: Excessive moisture penetration may lead to rot in timber elements, compromising overall structural integrity. Implementing damp proofing measures helps mitigate these risks.
Incorporating these preventive strategies is essential for maintaining a durable and resilient property, which ultimately enhances the long-term value of the investment.
Improves Indoor Air Quality
Damp proofing not only protects external walls but also significantly improves indoor air quality by minimising moisture levels that can lead to health issues like respiratory problems and mould growth.
This proactive approach creates a healthier living environment, ensuring that the air inside is cleaner and safer for inhabitants.
Effective damp proofing measures prevent the conditions that foster harmful allergens and pathogens, ultimately contributing to well-being. By reducing dampness, one can also lower the risk of smells associated with mould and mildew, which can interfere with comfort in the home.
It reduces airborne irritants.
It helps maintain an optimal humidity level.
It safeguards structural materials from deterioration.
In essence, investing in damp proofing is not just about the building's longevity; it’s about fostering a secure and healthy atmosphere for everyone who inhabits the space.
Increases Energy Efficiency
Damp proofing external walls can also lead to increased energy efficiency, as properly insulated and moisture-free walls maintain consistent indoor temperatures, reducing the need for excessive heating or cooling.
This consistency in internal climate is vital for both comfort and savings. By incorporating efficient insulation methods, buildings can minimise heat loss during winter months and keep interiors cool during the summer.
Improved insulation helps in maintaining energy efficiency by blocking thermal bridges.
Moisture-free walls prevent the formation of condensation, which can lead to mould growth and further heating issues.
As a result, maintaining a balanced temperature allows occupants to enjoy lower utility costs.
By focusing on these aspects, the overall sustainability of the building is enhanced, ensuring it not only performs well thermally but also contributes positively to energy conservation efforts.
Increases Property Value
Implementing damp proofing measures on external walls, along with regular examination and maintenance, can significantly increase property value, making the building more appealing to potential buyers by demonstrating a commitment to maintenance and longevity.
Such enhancements not only fortify the structure against moisture-related issues but also instil a sense of security in prospective purchasers. When evaluating a property, buyers are more inclined to pay a premium for homes that exhibit damp proofing solutions, reflecting the owner's dedication to quality and care. This not only boosts the immediate appeal but also influences long-term investment potential. In fact, properties featuring effective damp proofing can stand out in competitive markets and:
Reduce the chances of extensive repair costs.
Enhance overall living conditions by minimising mould and damp.
Attract a broader range of interested buyers.
Ultimately, the strategic implementation of such measures becomes a critical deciding factor in the property's journey through the real estate market.
When Should You Damp Proof External Walls?
Damp proofing external walls should be considered not only when visible signs of dampness appear but also as a proactive measure during construction or significant renovations to prevent future moisture-related issues, actively keeping salts and contaminants at bay.
Are you tired of dealing with clogged drains in your home? Drain cleaner could be the solution you're looking for.
This article explores what drain cleaner is, how it works, the different types available, and the precautions you should take before using it.
We also discuss how to effectively use drain cleaner in your toilet, what to do if it doesn't work, and how to prevent clogs in the future.
Stay tuned to learn everything you need to know about using drain cleaner effectively.
Drain cleaner is a product designed to help resolve plumbing issues, specifically to unclog drains in toilets, sinks, and other parts of your home's plumbing system. These cleaners are essential tools for maintaining a clog-free bathroom and kitchen, especially during high-use periods like holidays when guests and family members are around. Products like Drano and Liquid-Plumr are commonly used solutions.
How Does Drain Cleaner Work?
Drain cleaners work by dissolving organic material and debris that clog pipes, thereby allowing water to flow freely through the plumbing system again.
This process involves the use of powerful chemicals or enzymes that break down the blockages into smaller particles. Chemical drain cleaners typically contain substances like sodium hydroxide or sulfuric acid, which react with the organic matter, breaking it down into liquid or gas form.
Enzymatic drain cleaners, on the other hand, use enzymes like amylase or lipase to digest the organic materials, turning them into simpler compounds that can be easily washed away.
When poured into the drain, these solutions interact with the specific type of clog, whether it's caused by hair, grease, soap scum, or food particles. The chemical or enzymatic reaction liquefies the obstruction, allowing it to be flushed away with water.
What Are The Types Of Drain Cleaner?
There are several types of drain cleaners available, including chemical, enzymatic, hydro-mechanical, and homemade solutions, each designed to tackle different kinds of clogs.
Chemical Drain Cleaners
Chemical drain cleaners, like Drano and Liquid-Plumr, use strong chemicals to dissolve clogs and clear pipes.
Although these cleaners are convenient and often effective in unclogging drains, they come with certain risks that users should be aware of. For instance, the powerful chemicals can be harmful if not handled properly, leading to skin irritation or even more serious injuries. It is crucial to follow the instructions carefully, use protective gear such as gloves and goggles, and ensure proper ventilation when using these products.
Furthermore, chemical drain cleaners can also cause damage to older or weak pipes, potentially leading to costly repairs in the long run. Therefore, it is recommended to use them sparingly and consider alternative methods first, such as using a plumber's snake or a natural drain cleaner. Safety should always be the top priority when dealing with these potent chemicals to prevent any accidents or damages.
Enzymatic Drain Cleaners
Enzymatic drain cleaners utilize natural enzymes to break down organic material, making them an environmentally friendly option for unclogging pipes.
These cleaners contain specific enzymes that target and digest common culprits like hair, grease, food particles, and soap scum that clog drains.
Unlike harsh chemical drain cleaners that can damage pipes and harm the environment, enzymatic cleaners pose no risk to plumbing or the ecosystem.
The enzymes in these cleaners work by accelerating natural biological processes, effectively eliminating blockages without corrosive chemicals.
Hydro-mechanical Drain Cleaners
Hydro-mechanical drain cleaners use water jets to powerfully blast away clogs in the main drain and other pipes.
These innovative devices harness the force of pressurized water to break up obstructions and debris within plumbing systems. By utilizing water pressure in combination with a special nozzle design, hydro-mechanical cleaners can effectively dislodge even the most stubborn blockages, such as grease, hair, or mineral build-ups. The high-pressure water jet not only clears the immediate clog but also flushes out accumulated gunk along the pipe walls.
One of the key advantages of hydro-mechanical cleaners is their versatility, making them suitable for both residential and commercial applications. Whether it's a kitchen sink, shower drain, or a large sewer line, these devices offer a quick and efficient solution for severe clogs.
Homemade Drain Cleaners
Homemade drain cleaners often use common household items like baking soda, vinegar, and dish soap to create a natural, effective solution for minor clogs.
These ingredients work together to break down organic materials in the clogged drain, allowing water to flow smoothly once again.
One popular recipe involves pouring a cup of baking soda followed by a cup of vinegar into the drain.
Let it sit for about 30 minutes, then flush it with hot water.
The fizzing action helps dislodge debris and dirt buildup.
Compared to commercial drain cleaners that often contain harsh chemicals, homemade solutions are safer for the environment and can be gentler on pipes.
What Are The Precautions To Take Before Using Drain Cleaner?
Before using any drain cleaner, it's crucial to take several precautions to ensure safety, such as wearing protective gear, ventilating the area, and keeping children and pets away.
Wear Protective Gear
Wearing protective gear, such as gloves and goggles, is essential to prevent chemical burns and eye injuries when using drain cleaners.
Aside from gloves and goggles, wearing long sleeves and a mask is also crucial to fully protect oneself from the harsh chemicals present in drain cleaners. The gloves serve as a barrier to prevent direct contact with the skin, reducing the risk of irritation or burns. Goggles shield the eyes from splashes and fumes that could cause serious injuries. Long sleeves provide extra coverage to the arms, while a mask helps to filter out harmful fumes that could be inhaled during the cleaning process.
Ventilate The Area
Proper ventilation is necessary to disperse harmful fumes that might be released when using chemical drain cleaners.
Ventilation plays a crucial role in maintaining indoor air quality, not only by removing odors and pollutants but also by preventing the build-up of excessive moisture that can lead to mold growth.
Regarding ventilating a space, the most effective method is to open windows and doors to allow fresh air to circulate and push out any stale or contaminated air. Alternatively, using exhaust fans, particularly in bathrooms and kitchens where humidity levels tend to be higher, can help pull out unwanted odors and moisture.
Read The Instructions Carefully
Reading the instructions on the product label carefully ensures that you use the drain cleaner correctly and safely.
Following the manufacturer's guidelines for dosage, application, and safety warnings is crucial in avoiding potential hazards. Exceeding recommended amounts can lead to chemical burns or damage to your plumbing system. It's essential to protect yourself by wearing gloves and eye protection when handling the product. Ensuring adequate ventilation during application can prevent inhalation of harmful fumes. Remember, the manufacturer's instructions are designed to keep you safe and maximize the effectiveness of the drain cleaner.
Keep Children And Pets Away
Keeping children and pets away from the area where you are using a drain cleaner is crucial to prevent accidental ingestion or exposure.
When handling drain cleaners, it is important to be aware of the risks they pose to curious kids and nosy pets. These products contain harsh chemicals that can cause serious harm if ingested or inhaled. To ensure safety, store drain cleaners in a secure, high place out of reach of children or in a locked cabinet.
During application, make sure to close off the area with a gate or barrier to prevent access. Monitor any spillage and immediately clean it up to avoid accidental contact. After usage, securely seal the product and store it properly according to the manufacturer's instructions. Consider using safer alternatives like enzymatic drain cleaners that are less toxic but still effective.
How To Put Drain Cleaner In Toilet?
Using a drain cleaner in the toilet involves several steps, from choosing the right type of cleaner to measuring the correct amount and following through with proper application and flushing.
Choose The Right Type Of Drain Cleaner
Choosing the right type of drain cleaner depends on the nature and severity of the clog in your toilet.
After assessing the type of clog, it's crucial to consider the composition of the drain cleaner. For instance, chemical-based cleaners are effective for breaking down hair and grease build-ups, while enzymatic cleaners are gentler and more environmentally friendly. The compatibility of the cleaner with your toilet's material is vital to prevent any damage.
Evaluating the product's effectiveness for toilet use is essential. Look for drain cleaners specifically formulated for toilets to prevent corrosion or other harmful effects. Understanding these nuances will help you make an informed decision when choosing the right drain cleaner for your toilet.
Measure The Correct Amount
Measuring the correct amount of drain cleaner as per the product label instructions is vital for effective unclogging.
Regarding measuring drain cleaners, always make sure to use the designated measuring tools like a measuring cup or spoon provided with the product. Never eyeball the amount as it can lead to under or over-dosing, both of which can be ineffective or even harmful.
Accurate measurement is crucial to ensure that the active ingredients work optimally to break down the clog without causing damage to your pipes or posing any safety risks.
Pour The Drain Cleaner Into The Toilet Bowl
Carefully pour the measured amount of drain cleaner directly into the toilet bowl, targeting the area around the clog.
When pouring the drain cleaner, it's crucial to do so slowly and steadily to prevent splashing or spillage. Make sure to wear gloves and safety goggles to protect your skin and eyes from any potential contact with the chemical solution. Once the cleaner is poured, allow it to sit for the specified amount of time as indicated on the product label to ensure it effectively breaks down the clog. Avoid flushing the toilet during this time to allow the cleaner to work its magic.
Wait For The Recommended Time
Allow the drain cleaner to sit for the recommended time specified on the product label to dissolve the clog effectively.
Waiting for the designated period is essential as it gives the chemicals in the drain cleaner enough time to break down the blockage thoroughly. This step is crucial as rushing the process might result in only partially clearing the clog, leading to recurring issues. Patience is key when dealing with tough clogs; following instructions diligently ensures optimal results.
During this waiting period, it is advisable to keep the affected drain untouched and avoid running any water down it. This prevents diluting the cleaner and allows it to work solely on loosening the clog. Ensuring proper ventilation in the area can help disperse any strong odors that might arise from the cleaning process.
Flush The Toilet
After the recommended waiting time, flush the toilet to wash away the dissolved clog and clean the bowl.
When flushing the toilet to clear a clog, it is essential to observe the water flow. If the water drains smoothly without any signs of blockage, it indicates that the clog has been effectively cleared. If you notice the water backing up or draining slowly, the clog may still be present and may require further action to remove completely. Listen for any unusual noises during the flushing process, as this can also indicate potential blockages that need addressing.
Repeat If Necessary
If the clog persists, you may need to repeat the process to fully clear the obstruction.
If after the initial attempt the blockage remains, consider giving the solution more time to work its magic. Sometimes, especially with tougher clogs, a repeat application is necessary. Be patient and allow the solution to penetrate deeper into the clog. For particularly stubborn obstructions, you might want to try using a plumbing snake or auger to physically break up the blockage. Always remember to follow any safety guidelines and instructions provided by the manufacturer.
What To Do If Drain Cleaner Doesn't Work?
If the drain cleaner doesn't resolve the clog, it may be time to call a professional plumber who can use tools like a plumbing snake to address more severe blockages in your plumbing system.
Professional plumbers have access to a wide range of advanced tools and techniques that are essential for tackling stubborn clogs. These tools include hydro-jetting equipment that uses high-pressure water to effortlessly break down blockages, drain cameras to identify the exact location and cause of the clog, and pipe relining technology to repair damaged pipes without extensive excavation.
By seeking help from a plumber, you can benefit from their expertise in diagnosing and resolving complex plumbing issues efficiently. Professional plumbers can provide long-term solutions to prevent future clogs and ensure the optimal functioning of your plumbing system.
How To Prevent Clogs In The Future?
Preventing future clogs involves regular maintenance and adopting good habits, such as using toilet paper sparingly and educating family members on what can and cannot be flushed.
Regular maintenance is crucial to keep your plumbing system in top condition and avoid costly repairs down the road. Simple tasks like using hair catchers in the shower and sink, as well as pouring hot water down drains periodically, can significantly reduce the buildup of hair and soap scum. Ensuring that only toilet paper and human waste are flushed down the toilet will also go a long way in preventing blockages. It's essential to educate everyone in the household on these practices to create a collective effort to maintain a healthy plumbing system.
Keeping the drains in your bathroom floor clean is essential for preventing clogs and maintaining a healthy environment in your home. Neglecting to clean the drains can lead to unpleasant odours, slow drainage, and even water damage.
We will discuss why it is important to clean drains on the bathroom floor, the tools and materials needed for the job, a step-by-step guide on how to clean the drains effectively, and some tips and tricks for maintaining a clean drain.
Let's get started!
Why Is It Important To Clean Drains On the Bathroom Floor?
Cleaning the drains in the bathroom floor is an essential task that ensures the proper functioning of your plumbing system, prevents water accumulation, and maintains a healthy environment in your home.
What Are The Consequences Of Not Cleaning Drains In The Bathroom Floor?
Neglecting to clean the drains in the bathroom floor can lead to serious problems such as clogs, sewer gases backing up, and persistent blockages that can harm the entire plumbing system.
These issues can result in unpleasant odours permeating the bathroom due to the accumulation of organic matter, hair, soap scum, and other debris in the drains. The buildup of grime and sludge can attract pests and bacteria, creating unhygienic conditions within the bathroom. If left unchecked, the blockages can lead to water damage, mold growth, and even structural damage to the property. The presence of sewer gases not only causes foul smells but also poses health risks to the occupants of the house, potentially leading to respiratory issues and infections.
Tools And Materials Needed For Cleaning Drains In The Bathroom Floor
To effectively clean the drains in your bathroom floor, you will need a variety of tools and materials that can handle different types of blockages and debris.
What Are The Essential Tools For Cleaning Drains In The Bathroom Floor?
Essential tools for cleaning bathroom floor drains include a plumbing snake, a plunger, and specialized cleaning products designed to dissolve clogs.
Plumbing snakes, also known as drain snakes or augers, are long, flexible tools that are inserted into drains to dislodge and remove blockages. These tools have a coiled wire or cable that can be twisted and maneuvered through the drain to break up clogs efficiently.
Plungers, on the other hand, work by creating suction to help dislodge clogs that are closer to the surface. By applying pressure and pulling back rapidly, plungers can push and pull water in the drain to clear blockages.
Specialized cleaning products play a crucial role in drain maintenance. They contain powerful chemicals or enzymes that break down organic matter and debris, allowing for a smoother flow of water and preventing future clogs.
What Are The Recommended Materials For Cleaning Drains In The Bathroom Floor?
Recommended materials for cleaning bathroom floor drains include enzymatic cleaners, baking soda, vinegar, and protective gloves to handle debris safely.
Enzymatic cleaners are particularly useful in breaking down organic matter and eliminating foul odours that can often accumulate in bathroom drains. Simply pour the recommended amount as per the product instructions directly into the drain and let it sit for a specified time before rinsing it with water.
Baking soda mixed with white vinegar creates a potent cleaning solution that can help dissolve grease and grime buildup. After pouring the mixture into the drain, allow it to fizz and work its magic for about 30 minutes before flushing with hot water to clear out blockages.
Donning protective gloves is essential when dealing with debris and potentially harmful substances found in drain pipes. Always ensure proper ventilation when working with cleaning products to avoid inhaling any fumes and follow the instructions provided on product labels for safe usage.
Step-By-Step Guide For Cleaning Drains In The Bathroom Floor
Follow this step-by-step guide to efficiently clean the drains in your bathroom floor, ensuring that water flows smoothly and your plumbing system remains in optimal condition.
Step 1: Remove Any Debris Or Hair From The Drain
The first step in cleaning your bathroom floor drain is to remove any visible debris or hair that may be causing obstruction.
To accomplish this, you can use various tools such as a drain snake or plumbing snake to physically extricate the blockage. Another effective method is using a plunger to dislodge the material stuck in the drain. In case the clog is stubborn, a mixture of vinegar and baking soda can be poured down the drain to dissolve organic matter. Regular maintenance with a hair filter or strainer can help prevent future build-ups.
Step 2: Apply A Cleaning Solution
Apply a suitable cleaning solution to break down any remaining buildup in the drain.
There are various types of cleaning solutions that can effectively tackle different types of clogs and odours in drains. For instance, you can opt for a chemical drain cleaner, enzymatic cleaner, or a natural solution like baking soda and vinegar. Chemical drain cleaners are potent and work quickly to dissolve grease, hair, and other debris. Enzymatic cleaners utilize enzymes to break down organic matter gradually. Natural solutions are eco-friendly and safe to use regularly.
When applying these cleaning solutions, you should carefully follow the instructions on the product label. Typically, you will need to pour the solution down the drain, let it sit for a specified amount of time to work its magic, and then flush it with hot water. This process helps to effectively clean the drain pipes and prevent future clogs.
The benefits of using cleaning solutions in drains are vast. They help to maintain proper drainage, eliminate foul odours, and prevent costly plumbing issues down the line. Regular cleaning with these solutions can prolong the life of your plumbing system and keep your drains running smoothly.
Step 3: Use A Plunger To Dislodge Any Clogs
Using a plunger, create a seal around the drain and plunge vigorously to dislodge any stubborn clogs.
This tried-and-true technique can be a lifesaver when dealing with drain clogs. By applying firm pressure and maintaining a tight seal between the plunger and the drain opening, you increase the effectiveness of each plunge. The back-and-forth motion helps to create suction, dislodging the obstacle causing the problem. It's important to ensure that the plunger head covers the entire drain to maximize contact and pressure. It's recommended to repeat the plunging motion several times to fully clear the blockage.
Step 4: Rinse The Drain With Hot Water
After dislodging the clog, rinse the drain thoroughly with hot water to ensure it is clean and free of any residue.
Rinsing with hot water is crucial as it not only helps in removing any remaining debris or buildup in the drain but also plays a significant role in preventing potential clogs in the future. The hot water helps to dissolve and flush out any grease, soap scum, or other substances that may have accumulated within the pipes. The heat of the hot water can help to kill off any bacteria or mold that could be lurking in the drain, thereby contributing to a cleaner and more hygienic environment.
Step 5: Repeat If Necessary
If the drain is still not clear, repeat the previous steps until the blockage is fully resolved.
It is common for drains to become blocked due to a buildup of debris over time. Sometimes, the initial attempt may not completely clear the blockage, so it is important to stay patient and persistent.
When facing this issue, try using a drain snake or a plunger to dislodge any stubborn clogs. Pouring a mixture of hot water and vinegar down the drain can help break down grease and grime. Keeping up with regular maintenance can also prevent recurring blockages in the future.
Tips And Tricks For Maintaining A Clean Drain In The Bathroom Floor
Maintaining a clean drain on the bathroom floor involves regular upkeep and preventative measures to avoid future clogs and plumbing issues.
How Often Should You Clean The Drains In the Bathroom Floor?
It is recommended to clean the drains in the bathroom floor at least once a month to prevent any potential issues.
Regular cleaning of drains helps in avoiding blockages caused by hair, soap scum, and other debris that can accumulate over time. By maintaining a monthly cleaning schedule, you ensure that water flows freely, preventing any unpleasant odours or overflow situations.
What Are Some Preventative Measures To Keep Drains In The Bathroom Floor Clean?
Some effective preventative measures to keep the drains in your bathroom floor clean include using drain covers to catch hair and debris, and periodically using enzymatic cleaners.
Regular maintenance such as flushing drains with hot water can help prevent clogs from forming. Another great tip is to avoid pouring grease or oil down the drain, as it can solidify and cause blockages over time. For those with pets, consider using a lint trap in the laundry room to catch pet hair before it reaches the drains. In case of persistent clogs, a plumber's snake or a homemade mixture of vinegar and baking soda can help dislodge debris. Remember, proactive measures can save you from the hassle of dealing with a clogged drain in the future!
Conclusion
Regularly cleaning the drains in your bathroom floor is crucial for maintaining a healthy plumbing system and ensuring a clean and safe home environment.
Regular drain cleaning in your bathroom floor helps prevent clogs and blockages that can lead to costly plumbing issues. By maintaining clear drains, you reduce the risk of water backups, foul odours, and potential water damage. Clean drains promote proper water flow, improving the overall efficiency of your plumbing system. It also enhances the hygiene of your home, preventing the accumulation of bacteria and mold that thrive in stagnant water.
Taking these preventive measures can save you time, money, and hassle in the long run.
Are you tired of dealing with stubborn kitchen drain blockages? There are various factors that can lead to this frustrating issue, from grease and oil buildup to tree roots invading your pipes.
We will explore the common causes of kitchen drain blockage and provide practical tips on how to prevent it. Discuss effective methods for fixing a blocked drain, whether you opt for DIY solutions or seek professional help.
Learn about the signs of a serious drain blockage that you should never ignore!
What Causes Kitchen Drain Blockage?
Kitchen drain blockages are a common issue that many homeowners in Milwaukee and the Greater Milwaukee area face, often leading to standing water and the need for professional services. Understanding the root causes can help in preventing future instances of clogged drains.
Grease and oil buildup is one of the most frequent causes of clogged kitchen drains.
When we cook regularly, it's inevitable that some grease and oil will find their way into the sink. Initially, these substances may be in liquid form, but as they cool down, they solidify and stick to the inner walls of the pipes. Over time, this buildup accumulates and can lead to serious blockages.
While garbage disposals help by breaking down some of the smaller food particles, they are often not equipped to handle the greasy residue that clings to the pipes. Therefore, it's crucial to establish a routine maintenance schedule to prevent these issues, saving yourself both time and money in the long run.
Food Particles And Debris
Food particles and debris are another major culprit when it comes to kitchen drain blockages.
When food scraps and other remnants are not properly disposed of, they can easily find their way into the pipes, creating a buildup that restricts water flow and leads to clogs. These blockages can result in standing water, unpleasant odours, and even more serious plumbing issues if left unaddressed.
Therefore, it is crucial for individuals to properly utilize garbage disposal to break down food waste before it enters the drain system. By doing so, you can help prevent blockages and maintain the smooth functioning of your kitchen plumbing.
Soap And Detergent Residue
Soap and detergent residue can contribute significantly to clogged kitchen drains over time.
When soap comes into contact with minerals in water, the fatty acids present in the soap can combine with these minerals to create a tough residue that gradually builds up in drains. This residue can lead to blockages, restricting the flow of water and causing unpleasant odours. The best way to prevent this common issue is by using drain cleaners periodically to break down the residue and keep the drains clear. By incorporating drain cleaning into your regular maintenance routine, you can avoid costly and inconvenient plumbing problems in the future.
Tree Roots
In the Greater Milwaukee area, tree roots can often invade underground pipes, causing severe drain blockages.
When trees are planted close to residential or commercial properties, their roots naturally seek out water sources. Over time, these roots can grow into sewer lines, drainage systems, or plumbing pipes, leading to clogs and blockages. This can result in slow drains, backups, or even complete pipe ruptures if left untreated.
To prevent tree root invasion, it's essential to plant trees a safe distance away from any underground pipes. Regular inspections by plumbing professionals can also help detect early signs of root intrusion before they develop into major issues.
When faced with tree root blockages, do-it-yourself remedies like chemical cleaners or makeshift tools may not be effective in clearing the obstruction. In such cases, it's best to seek the expertise of professional plumbers equipped with specialized tools and knowledge to safely remove tree roots from the pipes without causing further damage.
How To Prevent Kitchen Drain Blockage?
Preventing kitchen drain blockages is crucial for maintaining a smoothly functioning kitchen, and a team of experts offers advice to homeowners in Milwaukee on how to achieve this.
Avoid Pouring Grease And Oil Down The Drain
One of the simplest ways to prevent kitchen drain blockages is to avoid pouring grease and oil down the drain.
When grease and oil are poured down the drain, they may cause a buildup on the pipe walls over time, leading to clogs that can be expensive and challenging to remove. Not only do these substances constrict the flow of water, but they can also attract other debris, exacerbating the issue.
To prevent this from happening, it is advisable to collect grease and oil in a designated container, such as an old can or jar, and dispose of it in the trash once it solidifies. This simple practice can go a long way in maintaining the proper functioning of your drains and preventing potential plumbing problems down the line.
Use A Drain Strainer
Using a drain strainer is an effective way to prevent food particles and debris from entering your kitchen drain.
By placing a drain strainer over the sink drain, you can easily catch food scraps, hair, and other gunk before they cause clogs. This simple yet essential kitchen tool not only helps maintain proper drainage but also extends the lifespan of your plumbing system. A drain strainer is environmentally friendly as it reduces the need for harsh chemicals to unclog drains.
There are various types of drain strainers available, including mesh strainers, perforated strainers, and twist-and-drop strainers. Depending on your needs and sink type, you can choose the most suitable one.
To keep your drain strainer in top condition, remember to clean it regularly by removing trapped debris and rinsing it with warm soapy water. Proper maintenance ensures optimal performance and longevity of the strainer.
Regularly Clean The Drain
Regularly cleaning the drain can go a long way in preventing blockages.
One effective method for keeping your drain clear is to pour a mixture of vinegar and baking soda down the drain, followed by hot water to flush out any debris.
Another handy tip is using a drain snake to physically remove any clogs that may have accumulated over time.
Consistency is key when it comes to drain maintenance; implementing these cleaning methods on a regular basis can help ensure a blockage-free drain and smooth water flow.
Avoid Flushing Food Particles Down The Drain
Avoiding flushing food particles down the drain is a simple yet effective way to prevent kitchen drain blockages.
Food particles in drains can accumulate over time, leading to clogs and unpleasant odours. When disposed of properly, these issues can be minimized.
A garbage disposal can play a significant role in breaking down food waste into smaller pieces that are easier to flush away without causing blockages.
To dispose of food waste correctly, consider using a compost bin for organic materials or a designated trash can for non-compostable items. By adopting these practices, you can maintain your drains and reduce the risk of costly plumbing repairs.
How To Fix A Kitchen Drain Blockage?
Fixing a kitchen drain blockage can be approached in several ways, ranging from DIY methods to professional intervention.
Use A Plunger
Using a plunger is one of the most straightforward methods to fix a clogged kitchen drain.
To properly use a plunger, start by ensuring there is enough water in the sink to cover the rubber cup. Place the cup over the drain opening, creating a tight seal to allow for effective suction. Maintain a firm grip on the handle and push down forcefully, then pull up quickly to create pressure that dislodges the blockage. Repeat this plunging motion several times if needed. Remember to use a plunger specifically designed for sinks and drains; common types include cup plungers and flange plungers, each suited for different drain sizes.
Try A Homemade Drain Cleaner
A homemade drain cleaner using boiling water, vinegar, and baking soda can be an effective solution for minor blockages.
Here's a simple step-by-step guide to make and use this homemade drain cleaner:
Begin by boiling a pot of water. This hot water will help soften and break down the blockage in the drain.
Next, pour 1/2 cup of baking soda down the drain. Baking soda is known for its ability to dissolve grease and grime.
Follow up with 1 cup of vinegar. The mixture of vinegar and baking soda causes a chemical reaction that can help dislodge debris.
Allow the solution to fizz and work its magic for about 15-30 minutes.
After the waiting period, pour another pot of hot water down the drain to flush away the loosened clog.
Using this homemade drain cleaner on a regular basis can help maintain clean and clog-free drains while avoiding harsh chemicals.
Use A Plumbing Snake
A plumbing snake is a useful tool for breaking up and removing blockages in your kitchen drain.
When you encounter a clog, the first step is to carefully feed the plumbing snake into the drain. Start by inserting the end of the snake, also known as the auger, into the drain opening.
Slowly twist and push the snake further into the pipe, making sure not to force it too aggressively to avoid damaging the pipe. Once you feel resistance, rotate the handle of the snake to break up the blockage. Keep feeding the snake until you feel the blockage has been cleared.
Call A Professional Plumber
If all else fails, calling a professional plumber is the most reliable option.
Professional plumbers bring a wealth of expertise to the table, having undergone rigorous training and possessing in-depth knowledge of various plumbing systems.
They are equipped with specialized tools and equipment that are essential for tackling complex plumbing issues efficiently.
By opting for professional services, homeowners can benefit from guarantees on the work done, providing peace of mind and assurance that the job will be completed to high standards.
Scenarios where professional help is necessary include major leaks, sewer line backups, water heater malfunctions, and renovation projects requiring plumbing adjustments.
What Are The Signs Of A Serious Drain Blockage?
Recognizing the signs of a serious drain blockage early can help you take prompt action and avoid more severe plumbing issues, which is why it's beneficial to be aware of these signs and know when to call in professionals.
Slow Draining Sink
A slow draining sink is often the first sign of a serious clog in your kitchen drain.
This issue can be quite frustrating, disrupting your daily routines and potentially leading to more severe plumbing problems if left unaddressed. The accumulation of food particles, grease, soap residue, and other debris can gradually build up within the pipes, restricting the flow of water and causing the sink to drain slowly. It's crucial to take swift action when you notice this early warning sign to prevent a complete blockage.
To alleviate the slow drainage, you can start by using a plunger or a drain snake to attempt to dislodge the blockage. Alternatively, try pouring a mixture of hot water and vinegar down the drain to help break down the clog. In some cases, a commercial drain cleaner may also be effective in clearing minor obstructions. Regular maintenance and mindful disposal of kitchen waste can help prevent future blockages and keep your kitchen sink functioning smoothly.
Foul Odour Coming From The Drain
A foul odour emanating from your kitchen drain is a strong indication of a serious blockage.
Trapped food particles and bacterial growth are the main culprits behind these unpleasant smells. When food debris gets stuck in the drain, it decomposes over time, causing a foul stench to permeate your kitchen. Bacterial growth thrives in moist environments, further exacerbating the odour problem.
To temporarily manage the smell, you can try pouring a mixture of hot water and vinegar down the drain or using baking soda to neutralize the odour. These are only temporary solutions. For a lasting fix, it's crucial to thoroughly clean the drain or seek professional help to address the underlying cause of the blockage.
Gurgling Sounds
Gurgling sounds coming from your kitchen drain are often a sign of a serious clog.
This peculiar noise is caused by air trapped within the pipes due to a blockage preventing the proper flow of water. As the water tries to pass through the obstruction, it pushes air bubbles, creating the distinct gurgling sounds you hear. If this issue is left unattended, it can lead to more severe plumbing problems, such as backups and leaks.
To address the clog, you can try using a plunger or a drain snake to clear the blockage.
Regular maintenance of your drains can help prevent such issues in the future. It is crucial to address drain gurgling promptly to avoid more significant complications down the line.
Multiple Clogged Drains
Experiencing multiple clogged drains in your home is a clear sign of a severe blockage in your plumbing system.
When you notice that water is not draining properly in more than one area of your house, it is likely that the issue lies deeper within your plumbing system.
A main sewer line blockage may be causing this widespread problem, leading to backups and slow drainage across various fixtures.
To prevent potential damage and health hazards, it is crucial to address this issue promptly.
Attempting to resolve it on your own with store-bought solutions may provide temporary relief, but the underlying cause requires professional assessment and repair.
Solid wall insulation is a crucial component of energy-efficient homes, helping to keep properties warm and reduce energy bills.
We will explore the various types of solid wall insulation, including internal and external options, as well as the benefits and drawbacks of each.
Find out about the installation process, the best materials to use, and how solid wall insulation can improve comfort, energy efficiency, and soundproofing in your home.
Learn more about this essential home improvement solution.
What Is Solid Wall Insulation?
Solid wall insulation is a method of enhancing the energy efficiency of buildings with solid walls by applying insulating materials to either the internal or external walls.
This process helps in reducing heat loss in buildings, ensuring a more comfortable living environment while also lowering energy bills.
When considering internal solid wall insulation, materials like rigid insulation boards are often used, which are fixed to the inner wall surface.
On the other hand, external solid wall insulation involves adding a layer of insulation to the outside of the building, which can improve its appearance as well.
Why Is Solid Wall Insulation Important?
Solid wall insulation is crucial for improving energy efficiency, reducing energy bills, and combating climate change, especially during the ongoing energy crisis.
One of the key ways solid wall insulation contributes to energy efficiency is by creating a thermal barrier that helps to prevent heat loss during colder months and keeps homes cooler in the summer. This results in reduced reliance on heating and cooling systems, leading to lower energy consumption and subsequently decreased energy bills.
Furthermore, by enhancing the thermal performance of buildings, solid wall insulation plays a significant role in reducing greenhouse gas emissions, thereby contributing to the fight against climate change. Insulated properties are more energy-efficient and require less energy to maintain comfortable temperatures, aligning with global efforts to promote sustainability.
What Are The Types Of Solid Wall Insulation?
There are two main types of solid wall insulation: internal wall insulation and external wall insulation. Each type uses different insulating materials and methods to improve a building's thermal efficiency.
Internal Solid Wall Insulation
Internal solid wall insulation involves the use of insulating materials such as plasterboard and thermal insulation applied to the interior walls, often supported by stud walls.
Plasterboard is a common choice for internal solid wall insulation due to its versatility and ease of installation. It acts as a barrier to heat loss, helping to improve the energy efficiency of a building.
Stud walls play a crucial role in providing structural support for the insulation materials, ensuring they are securely attached to the walls. This framework also allows for the installation of additional layers of insulation if needed, further enhancing the thermal performance.
There are various types of thermal insulation materials available for internal solid wall insulation, including foam boards, mineral wool, and reflective insulation films. Each material has its own unique properties in terms of thermal conductivity, moisture resistance, and fire safety, providing options to suit different needs and budgets.
External Solid Wall Insulation
External solid wall insulation entails fixing rigid boards to the exterior walls of a building, followed by a layer of render or cladding to protect and finish the surface.
This method is highly effective in providing additional insulation to the building, therefore helping to reduce energy costs and improve overall energy efficiency. The rigid boards act as a barrier against heat loss, preventing cold spots and drafts within the structure. The application of render or cladding offers an extra layer of protection against weather elements such as rain, wind, and UV rays, ensuring the durability and longevity of the building's exterior.
Increased energy efficiency is one of the primary benefits of solid wall insulation, as it helps to retain heat within the building, improving its EPC rating.
When a building is well-insulated, the need for constant heating or cooling reduces significantly. This reduction in energy consumption not only leads to cost savings for the occupants but also has a positive environmental impact by lowering carbon emissions. Different types of solid wall insulation, such as internal, external, or cavity wall insulation, offer varying levels of thermal performance. These options allow homeowners to choose the most suitable solution based on their specific needs and budget.
Improved Comfort And Temperature Control
Solid wall insulation significantly enhances indoor comfort and temperature control by using insulating materials that maintain a consistent indoor climate.
More specifically, materials such as expanded polystyrene (EPS), polyurethane foam, and mineral wool are commonly used in solid wall insulation due to their excellent thermal resistance properties. These materials effectively reduce heat transfer through walls, thus preventing heat loss in cold weather and heat gain in hot weather.
In addition, the dense nature of these insulating materials helps to dampen noise transmission, creating a quieter and more peaceful indoor environment. This added benefit contributes to an overall improvement in the quality of living spaces, making them more inviting and comfortable.
Reduced Energy Bills
One of the key advantages of solid wall insulation is the reduction in energy bills, leading to substantial savings over time.
Solid wall insulation acts as a barrier, preventing heat loss through external walls, which in turn reduces the need for constant heating to maintain a comfortable temperature indoors. By keeping the heat inside your home, less energy is required, resulting in lower energy consumption and decreased utility costs. For instance, depending on the type of insulation used and the size of the property, homeowners can save anywhere from 10% to 40% on their annual heating bills. This means that the initial investment in insulation pays off in the long run, with increasing financial benefits over time.
Soundproofing
Along with thermal benefits, solid wall insulation also offers excellent soundproofing qualities by adding an extra layer of insulating material to internal walls.
By incorporating solid wall insulation, the acoustic comfort within a home can be significantly enhanced. The additional barrier helps to absorb and reduce noise transmission, creating a peaceful living environment. This feature is particularly beneficial for homes located in noisy urban areas or near busy streets, where external sounds can disrupt daily activities. Improved soundproofing can also contribute to better concentration levels, sleep quality, and overall well-being of occupants. Solid wall insulation effectively restricts the passage of sound waves, ensuring a quieter and more serene indoor space.
What Are The Drawbacks Of Solid Wall Insulation?
Whilst solid wall insulation offers many benefits, it also has some drawbacks, including higher upfront costs, potential disruption during installation, and limited aesthetic options for external walls.
Higher Upfront Costs
One of the main drawbacks of solid wall insulation is the higher upfront costs involved, although some grants may be available to offset these expenses.
When considering the financial implications of installing solid wall insulation, it is essential to acknowledge the initial investment required for the process. The cost of materials, labour, and any additional work needed for the installation can add up quickly. The good news is that various government grants and schemes aim to ease the financial burden for homeowners looking to improve their insulation.
Potential Disruption During Installation
The installation process for solid wall insulation can cause significant disruption, particularly if internal walls are being insulated, requiring skilled installers to manage the process efficiently.
One common disruption during the installation of solid wall insulation in internal walls is the need to move furniture and belongings to provide clear access for the installers. This relocation process can be time-consuming and may result in temporary inconvenience for the homeowners.
The installation of insulation can create dust and debris, which can spread throughout the house if not properly contained. This can lead to extra cleaning efforts and potential respiratory irritations for those living on the property.
Professional installers are equipped to handle these challenges effectively, ensuring a smoother and less disruptive insulation process for homeowners. They have the expertise to minimise disruptions, protect the property, and deliver high-quality insulation installation services.
Limited Aesthetic Options
Solid wall insulation may offer limited aesthetic options, particularly for external walls, as the use of cladding or render can alter the building's external appearance.
When considering the installation of solid wall insulation, it is crucial to evaluate how different cladding materials or render finishes will impact the overall look of the property.
While some homeowners prefer a modern and sleek aesthetic achieved through metal cladding options, others may opt for a more traditional appearance using timber cladding.
Alternatively, the application of render can provide a uniform and smooth finish, enhancing the facade's texture and colour.
How Is Solid Wall Insulation Installed?
The installation of solid wall insulation involves specific methods and can vary depending on whether internal or external walls are being insulated. Each method has its own associated costs and potential for disruption.
Internal Solid Wall Insulation Installation Process
The installation process for internal solid wall insulation typically involves attaching plasterboard or foam insulation to the internal walls, often supported by a stud wall framework.
Before beginning the installation, it is essential to prepare the internal walls by cleaning and ensuring they are free from any debris or moisture that could affect the insulation's effectiveness.
Once the walls are ready, the next step is to choose between plasterboard or foam insulation. Plasterboard is often used for its versatility and ease of installation while foam insulation provides excellent thermal efficiency.
After selecting the type of insulation, it is time to attach it to the internal walls securely. For plasterboard, it is typically screwed in place, while foam insulation may require adhesive. The stud wall framework is then constructed to provide additional support and create a cavity for the insulation material.
External Solid Wall Insulation Installation Process
To install external solid wall insulation, rigid boards are attached to the exterior walls, followed by a layer of render or cladding to finish and protect the surface.
Before the installation process begins, thorough preparation of the external walls is crucial. This involves cleaning the walls to remove any dirt or debris, repairing any damages, and ensuring a smooth surface for the rigid boards to adhere properly. Once the walls are prepped, the rigid boards are carefully measured and cut to fit the specific dimensions of the walls, ensuring a snug and secure fit.
After the boards are attached, the next step involves applying a layer of adhesive to ensure they are firmly in place. This adhesive helps create a strong bond between the boards and the walls, providing a solid foundation for the insulation. Once the boards are securely attached, the final step is to apply the chosen finish, whether it be render or cladding. The finish not only enhances the aesthetic appeal of the walls but also adds an extra layer of protection against external elements, ensuring the longevity of the insulation system.
What Are The Best Materials For Solid Wall Insulation?
The best materials for solid wall insulation include rigid foam insulation, mineral wool insulation, and natural insulation materials, each offering unique benefits for thermal efficiency and sustainability.
Rigid Foam Insulation
Rigid foam insulation is a popular choice for solid wall insulation due to its excellent thermal insulation properties and ease of installation using rigid boards.
One of the key advantages of rigid foam insulation is its high thermal efficiency, which helps to reduce heat loss and improve energy efficiency in buildings. The rigid boards used in the installation process are lightweight and easy to handle, making them ideal for both DIY projects and professional installations.
Rigid foam insulation can effectively reduce noise transmission, improving the overall comfort levels inside a building. It also has a relatively long lifespan, providing durable protection against moisture and mold.
It is important to note that rigid foam insulation can be more expensive upfront compared to other insulation materials. In some cases, improper installation of rigid boards can lead to thermal bridging issues, reducing the overall effectiveness of the insulation.
Mineral Wool Insulation
Mineral wool insulation is another effective material for solid wall insulation, known for its thermal performance and added benefit of soundproofing.
It is composed of natural minerals, making it a sustainable choice for insulation. The dense fibres trap pockets of air, creating a barrier that minimises heat transfer and reduces energy consumption.
This type of insulation also excels in sound absorption, making it an ideal solution for homes located in noisy environments or for soundproofing specific areas. The application of mineral wool insulation involves fitting it between wall studs or joists, ensuring a snug and continuous coverage.
One of the main advantages of mineral wool is its fire resistance, providing an extra layer of protection to buildings. Its durability and moisture-resistant properties contribute to its long lifespan and effectiveness.
Natural Insulation Materials
Natural insulation materials, such as various wool types, offer eco-friendly options for solid wall insulation, combining sustainability with effective thermal performance.
Other eco-friendly options for solid wall insulation include materials like cork, recycled denim, and hemp. These materials not only provide excellent thermal efficiency but also contribute to reducing the carbon footprint of buildings.
Wool types are particularly popular due to their renewable nature and ability to regulate indoor temperatures effectively. Cotton insulation, sheep's wool, and cellulose insulation derived from recycled paper offer sustainable alternatives for enhancing the energy efficiency of buildings.